Wednesday, December 29, 2010

Social Market for a Mirrix

Ever try to warp a loom with a cat in the house? Let’s just say it’s a bit of a challenge. Once the loom was warped though, Midnight was a very attentive student. That is, until he decided I was sitting where he wanted to sit. So he bit me.

I’ve finally made actual progress on the Dragon Lake, Siberia tapestry. And the clock is ticking. Someone with a particular affection for that part of the world wants to buy it. And he wants it by Friday. So, it’s going to be an all nighter at the loom. The upside to this is that I’ll definitely be starting a new piece on Saturday which I’m really excited about. I’ve already started gathering up all of the yarns that I want to use.


In an effort to make things a little more interesting here, I’ll be focusing on more experimental pieces for the remainder of the “Social Market for a Mirrix” campaign. I find weaving the tapestries based on the LandSat photos very relaxing and meditative but they’re just not that interesting from a viewer’s perspective. So, I’m moving the tapestries that I’ll be working on for show deadlines off to another loom because they’re larger pieces that are, for the most part, just straight tapestry weaving. They won’t be very interesting to see from week-to-week.

Saturday, December 25, 2010

Social Market for a Mirrix

And it's a blast from the past! Once again I'm working on one of the weavings I finished back in October.

After taking a break, I finally decided the weaving needed a little oomph so out came the beads. And, okay, I'm cheating a bit and using several of the Bead Gravy glass bead mixes, one in greens and one in golds, from Joggles.

Oh, while I'm thinking about it, this week's video will be posted on Tuesday, December 28th instead of Sunday, December 26th.

Anyway, back to the embellishing. All along, I've thought this small weaving looked like a Southwest landscape. But, the greens were a little too green. The beads I'm working with have a variety of shades of green so the embellishment adds a little depth and personality to the piece, I think.

I also found a package of some really interesting silk waste in sunset colors (blues, oranges, purples) in one of my bins so I'm planning to work that into the sky.

There will also likely be an appearance by some of the fibers by Ancient Earth Echoes as embellishment on the cliffs.

Don't forget Mirrix Looms Bead & Tapestry Cuffs Workshop at Village Spinning and Weaving in Solvang, CA on February 5 - 6, 2011. The registration deadline in January 15, 2011.

Wednesday, December 22, 2010

Social Market for a Mirrix

I finally just said enough is enough, hid myself away in the studio on Monday, and spent some time weaving. So there’s been a bit of progress since the last post. I’m looking forward to finishing this weaving because I have a couple of techniques I want to experiment with once it’s off the loom. I’ll share more of those details once I’m closer to being finished.

Remember the first piece I completed?

I needed a portable project so I’ve finally started embellishing it and will have something to show you on Saturday. Working on that first weaving again reminded me how much I like weaving with yarns that have variegated colors and textures.

Mirrix is having a post-holiday loom sale so everything is 15% off in the Mirrix store with the code: 15offeverything. Also, don’t forget to subscribe to the Mirrix Loom newsletter. Each week you’ll receive information about the latest deals, “how-to” videos, classes, contests, and featured artists. It looks like Elena and Claudia have lots of new content heading our way in 2011 and I know I’m looking forward to seeing what they’ve been working on. I seem to remember seeing a tweet recently about a new loom.

Monday, December 20, 2010

Social Market for a Mirrix Video #8

Trice Looming!

Time, these days, is so precious to all of us! Even I am looking at ways to create the same level of quality looming within a shorter amount of precious time! I want to share a technique I have been perfecting for a while, "Trice Looming"! This method allows you to 'loom & edge' at the 'same time'! Below are the steps in pictures.

String your loom as you would start any new looming project, warping one thread more then the number of loomed beads wide. Now string on a good number of edging beads, usually something round, not tubular like a Delica. This type of bead lays much nicer for this simple line edge. You will want to thread 5 or so more number of beads than the rows you plan to loom. These can be added after the initial warps are strung or string the beads first and warp the loom with the two extra warps stacked with beads.

Attach your weft to the outside warp of your looming row, not the same thread holding your edging beads. Loom the first row as if the two outside warps with beads are not there!

Just after exiting this row, slide an edge bead up and run your needle inside, towards you.

Now add the next number of beads needed to loom the next row, in this case there are ten beads creating this narrow banding.

Before turning your needle upwards and running it back inside the same row of beads, above the warps (the usual looming methods), pick up another edge bead from the other side.

Now you can continue the usual looming technique of going back through the row of beads, keeping your needle above the warps.

When you exit on the starting side, pick up another edge bead, just as you did in the first step described. Continue looming these steps until you reach the desired length of looming you need.

This Trice Looming Style, creates a simple edge with the edge beads sitting on their sides. This also finishes the looming to a classic look, no holes or threads showing!


I have many other variations of this same method, creating edges much more intricate then this simple line. Those will be shared in my book! In the meantime, you can experiment with adding more or less beads and additional warps full of beads! If you plan on creating a scalloped type edge, you'll need to keep those warps free for movement as the warp threads will be used up or longer, than what you attach to the loom.

Sunday, December 19, 2010

Finishing a loomed cuff with an adjustable clasp!


I just completed another cuff, with a design fit for the season! This is titled, "Who-Me Deer?". It is a 30 bead wide loomed cuff. When I create such a wide cuff, my main staple of clasp choices become a slide tube clasp. They have a long presence, mostly 35mm. I never cared for the design of a 'single loop' or 'small single clasp' on a wide cuff, because I wouldn't want it to flip or flop around on the wrist. I also feel that a single, small clasp, of some sort, on a wide looming, just doesn't offer a proper 'balance in design'.

The adjustable aspect, of this design, is also something I am sharing. It can be difficult to loom cuffs to an exact fit, without having the model to refer, so an adjustable design can be a great feature.

I call the end caps, seen in the photos above, my 'crunchy clasp' method. The reason being that beads are 'cracked' when they are attached. It can be very uneasy to think about the beads breaking, but my technique keeps the cracking of beads into consideration, long before I have to attach the 'CC's' to the ends!

The one end of this cuff is finished with a copper chain, for the adjusting part, topped off with a dangle, a custom made 'snow globe lamp work bead'. On the other end is a copper wire hook clasp and matching stones, again wrapped in copper wire.

Above is a montage of the edging. The large beads are 'copper barrels' aligned perfectly between four rows of looming. There is a 'stop bead' two beads inward because I wanted the barrels to lay directly next to one another. This stop bead allowed me to enter a row of looming then exit the same row of looming. To secure the large barrel beads further, I strung a strand of copper 11/0 glass beads, directly inside the entire row. This will keep each barrel bead in line, especially while being worn or bending the cuff. The opposite edge was finished in a simple copper color Permanent Finish 11/0 glass bead.

This method of clasping a loomed cuff can be the simplest way to manage the warps and still complete a cuff in a professional finished manner!

Saturday, December 18, 2010

Social Market for a Mirrix

Here's a close-up shot so you can see how the warp interlock technique looks.

I've been working at the Santa Fe International Folk Art Market's Pop-Up Shop this past week so time in the studio has been non-existent so I don't really have anything new to show today. And unfortunately, other than a few hours on Sunday, I won't really be back to a regular studio schedule until December 28th because of the holidays.

Since I don't have much of my own work to show right now, I want to introduce you to the weavings / embroideries created by members of Artesanias WARI URPI (Macedonio Eduardo Palomino Torres and Luzmila Huarancca Gutierrez0 from Peru.

These colorful representations of the flora and fauna of Peru are just a sampling of the beautiful textiles being sold in the Santa Fe International Folk Art Market's Pop-Up Shop this weekend. These works reflect the traditional embroidery of the WARI-URPI's ancestors and can be traced back to the 8th century B.C. Worn daily by the WARI women of the Huanta-Ayacucho region, woven and embroidered shawls called"llicllac" are frequently used to carry children, crops, or wood. Special garments are also woven and embroidered specifically to be worn during the feast of the Virgin of Cocharcas.

Wednesday, December 15, 2010

Social Market for a Mirrix

The weaving of Dragon Lake, Siberia is coming along and youre starting to see a little more of the lake and tributaries being defined now. I do have a spot on the bottom right corner thats bothering me a bit but Im confident Ill be able to resolve that issue once the weaving is cut off the loom. The warp interlock technique is definitely giving me the jagged areas of color that I was looking for so Im happy with that.

Theres been no rest for the wicked this week as Im getting a few minutes in the studio each evening and thats about it. I have to admit I cant wait for the holidays to be over so life will get back to normal and Ill have more time to spend in the studio. Fortunately, for me life starts to get back on schedule the week between Christmas and New Years. I have a stack of land sat photos waiting, as well as a number of deadlines looming, so Im anxious to finish this one and start the next.

Just a quick reminder that Sunday, 12/19/10 is the last day to order a loom if you want it to arrive in time for Christmas.

Saturday, December 11, 2010

Social Market for a Mirrix

I had hoped to get a mid-week video posted but suddenly it was Saturday and no extra video. Not quite sure where the week went.

In the ramp up to the holidays, there hasn't been much time to spend in the studio so the weaving is coming along slowly. But I'm loving these colors. And so far I'm happy with the raggedness of the green area. I'm being careful that the weaving doesn't become too linear and symmetrical. The darker splotches you see on the pattern will be done in the darker purple Tahki Cotton Yarn.


One of the things you have to be careful of when you first start weaving is not to pull the weft too tight otherwise the sides of the weaving won't be straight. I usually measure the width of the weaving after every inch to make sure everything is okay. As you can see, the warp threads are still evenly spaced. If you see that warp threads are starting to pull together, you can use a bobbin to space them out again if you catch the problem early in the weaving. Using heddles and the shedding device also helps keep the weaving even. Right now I'm weaving with a combination of needles and butterflies instead of stick shuttles or bobbins.

I'll be working at the Santa Fe International Folk Art Market's Pop-up Shop next weekend. We've received some really amazing textile work from India and I'm hoping there are some weavings waiting to be unpacked. If I come across any, I'll share pics on the blog next week.

Wednesday, December 8, 2010

Social Market for a Mirrix

Ive started weaving the LandSat photo of Dragon Lake Siberia and that Tahki Cotton Classic is a dream to weave with. Im actually further along now than this picture shows but I wanted to show the beginning of the weaving.

The beige threads at the base of the weaving are the hem. The purpose of the hem is to space out the warp threads evenly and it gives me a foundation to work on. Once the tapestry is finished, I will remove the hem before knotting the warp threads. Some weavers turn the hem under and stitch it to the back of the tapestry.


I mentioned in a previous post that I will be using 3 colors of the Tahki Cotton Classic in this weaving. You can see 2 of the colors above. There are a number of tapestry techniques to consider when weaving and Im using a warp interlock (wefts in adjacent areas share a common warp) technique here. The warp interlock technique creates a more jagged edge where the 2 colors meet. Since Im working from a LandSat photo, I wanted to avoid the hard edges that can sometimes be the result of using a slit technique.

One of the subjects I meant to cover in the last video was tools for passing the weft thread through the shed. I make my decision based on the design and use either bobbins, stick shuttles, butterflies, or long needles. In my opinion, butterflies are the easiest for the beginning weaver to start with.

Again, I would highly recommend Nancy Harveys Tapestry Weaving: A Comprehensive Study Guide or Kristen Glasbrooks Tapestry Weaving if youre just getting started.

Saturday, December 4, 2010

Social Market for a Mirrix


This is a LandSat image of Dragon Lake, Siberia and the design for the tapestry I'm preparing to start this evening.

I came across NASA's LandSat website, started looking through their image gallery and was immediately hooked. Some of the images are really amazing and will make beautiful abstracts so I downloaded a number of them for possible use as tapestry designs. I'm starting with one of the simpler images and if I'm happy with the results of the first weaving, it might make for the beginning of an interesting series.

The loom is warped for the new piece which will be 10 inches wide x 8 inches high and you can see the printout of the design behind the warp threads.

Using Adobe Photoshop, I applied a filter to the original image and stripped out some of the detail in order to make the pattern easier to following as I'm weaving.

I'll be using Tahki Cotton Classic yarn for this piece and these are the colors I've selected. This is a 100% mercerized cotton yarn that comes in a huge range of colors (125 colors) and has a bit of a shine to it. It reminds be a lot of the Pearl Cotton that I use in my smaller pieces. It also has a nice smooth texture to it so it's quick and easy to weave with.

I feel like I've had so many false starts and am just now beginning to develop a good working relationship with the new loom. It was a bit of an adjustment getting used to using the shedding device since I was used to using treadles. I never realized how much I work on auto-pilot until I started working with the new loom.

Wednesday, December 1, 2010

Social Market for a Mirrix

Ive tried to think of a positive way to spin this but the reality is

The Southwest landscape weaving is now residing in the wastebasket beside my work table. I just wasnt happy with it and the more I worked on it, the more frustrated I became. It was the sky and the valley area that was causing the problems for me. I just couldnt get that illusion of depth and distance that I was looking for. When I found myself starting to dread going into the studio to weave, I decided lifes too short to spend time working on something that wasn't making me happy and it came off the loom. No, there are no more pictures, it was that bad.

One a more positive note, someone contacted me Monday evening about commissioning a small tapestry so that will likely be the next project. But, while I'm working out the details for that project, I decided to work on a quickie project and use up some of the remnants of yarn, fiber, and ribbon I've been collecting.

For this piece, I warped the loom using regular bulky yarn instead of C-Lon cord then used the same yarn for the weft, incorporating the scraps as I worked. The piece is about 10 inches wide and about 12 inches high. Im thinking about attaching a handmade mask in the middle of the weaving then mounting the piece on a black background and framing it.

Saturday, November 27, 2010

Creating Dimensions in Looming!

There are many ways to create dimension, to a 2D looming pattern. One way is to add an outline, as I did here, for the basic design of my Lotus SLN. This gives depth without adding much more, but for me, it is adding an additional layer that I wanted to add.

It is accomplished much like you would complete 'bead embroidery', stringing three or four beads, taking a stitch then going back through the last two or three beads added. When I make my stitch, I am careful to only pick up either the warp or run my thread through a set of loomed beads. This way, I won't have any threads showing on the underside of my looming when finished, nor will I have to back my design.

To create the next level of dimension, I thread a 6mm Permanent Silver Metallic bead onto the thread, securing this bead in between the level I am adding and the base below. You can notice a few of these large beads, placed in between my petals. Some areas, I chose to add two instead of just one.

If you are familiar with 'Paper Tole', the art of cutting out the same design and reassembling the picture using silicone glue to make the picture look 3D. I call my method of creating dimension on this SLN, 'Bead Tole'.

Looking from different vantage points, you can see the dimensions come to life. I am even including some 'cupped' petals which will also create a realistic feel, as in the petal on the lower right side.

From the front view, you don't notice the levels of dimension, but after adding more, you will be able to notice this picture from any angle.

There is many more parts to chart/graph and hand weave, which will finally bring me to my total picture. I have attached all that I have completed, to this point, and will be graphing out other portions to hand weave. The green leaves, in the lower part of the Lotus, will be some of the last parts added, as they stand further forefront.

Social Market for a Mirrix

Here’s where I’m at right now with the Southwestern landscape. There hasn’t been a lot of progress since Wednesday’s blog post due to the holiday but I’m looking forward to having some dedicated time in the studio over the next few days to get some weaving done.

I cropped and rotated one of the photos to give you an idea of what it will eventually look like when it’s finished.

Im still working out what Im going to use for the sky. One of the things I love about living in the Southwest is the sunsets but replicating those colors is always a challenge. Nothing that Ive tried so far is quite right.

And I may do the next version in 3/2 Pearl Cotton instead of my original plan. The Pearl Cotton has such a beautiful sheen to it and there are so many colors to choose from that you can create incredibly nuanced details in weavings.

There have been so many new ideas that I want to try coming up lately that Ive started keeping a journal on my work table to make notes of ideas and color combinations. There just arent enough hours in a day.

For those of you interested in seeing some truly beautiful tapestry work, take a look at the Artist Pages on the American Tapestry Alliances website.


Wednesday, November 24, 2010

Social Market for a Mirrix

Okay, heres where Im at right now. As you can see, the rock faces that make up what will be the left side of the tapestry are done and Im working my way up what will eventually be the bottom of the tapestry. Im not sure Im completely happy with the way the rocks currently look but Im reserving final judgment until the piece is completed and off the loom.


Once this piece is finished, Im planning to do another version using the same yarns but with the cartoon oriented correctly. I think it will be interesting to see the similarities and differences between the two pieces based on the direction of the weaving.

Im heading to the Needles Eye this weekend to see if I can find some yarn for the sky that will make me happy. Something variegated with blues and sunset colors.

On another note, Im loving the recycled silk yarn from India. Such lush vibrant colors. Right now Im picturing it combined with black yarn in a large wall hanging. Maybe with some gold or bronze metallic fibers. And beads. Lots and lots of beads.

If you have a few minutes, check out Weaving Todays blog post Of Memory and Hope and the Centro de Textiles Tradicionales del Cusco, a nonprofit organization working to promote the history and production of traditional Peruvian textiles.

Sunday, November 21, 2010

Social Market for a Mirrix Video #4

Lotus SLN

The Mirrix is perfect for an SLN!

My next looming is something I have shared earlier, but needed to take some time off to complete a few commissions and other projects. I'll be looming full force on this SLN, (split loomed necklace), from now on. To start, I am sharing a picture of where I am to date.

In the picture above, you notice the loomed base of my SLN, being the large part of my pattern, A Lotus. Also attached are a few of the petals, I am hand weaving. The entire Lotus will be completed with 3D petals and leaves. Here are few that I haven't attached yet.

After I complete the bulk of the 'petal additions', then I will complete the lower end of the looming, all the while I will be scribbling and graphing out some interesting designs for the upper looming. The warp weights attached are giving me 'creative license' to make some neat designs! The Mirrix is also perfect for utilizing the warp weight method!

Saturday, November 20, 2010

Social Market for a Mirrix

I started a small tapestry this morning. In order to create my cartoon, I pulled up the photo I wanted to use in Adobe Photoshop (Im using Creative Suite 4), re-sized it to 7 ½ inches high by 10 inches wide, set the Mode to Grayscale, applied the Photocopy filter, then printed a black and white version, as well as a color version. This is basically the same process I use when Im creating transparencies to create solarplates for printmaking. Theres really more detail than I need in the cartoon for this version of the tapestry but it will be useful later.

The black and white version is placed behind my warp threads to provide the pattern for me to follow as Im weaving and the color version hangs on the wall in front of me as a color reference. Picture red rock cliffs, a valley, blue sky with the beginnings of a sunset.


As you can see, I have the cartoon rotated 90 degrees counter-clockwise. Since Im using a variegated yarn for the rock faces, working in this direction gives the rocks a more natural look. Once again, Im using the Feza Fiona in earth tones for the rock faces.

While I was mucking about in Photoshop earlier I created a number of cartoons for future tapestries including a couple of abstracts that Im really excited about. The color variations are gradual and very subtle so theyre probably going to be a test of my patience. And I need to find just the right fibers to work with.

One thing Ive decided after working on the 16 Mirrix is that Im going to upgrade to the largest Mirrix loom in 2011. Im really starting to feel the need to begin working large.

Dont forget to stop by WeaveZine to hear Syne's interview with Claudia. I have a very eclectic (okay, okay, Im more than a bit eccentric) background so Im always fascinated by how people got started doing what they do.

Also, check out the blog the gift half understood. Shes doing some really interesting sculptural work with weaving "influenced by monolithic standing stones, burial rituals, stone surfaces, and offerings".

Friday, November 19, 2010

Claudia Chase Interview on Syne Mitchell's WeaveZine Podcast

Mirrix President/founder/soul Claudia Anne Chase was interviewed last winter by WeaveZine editor Syne Mitchell. Listen to the podcast and learn more about Claudia and Mirrix.

http://www.weavezine.com/audio/54-claudia-chase-mirrix-looms

Thursday, November 18, 2010

Sharing 'A Glorious Day', completed!

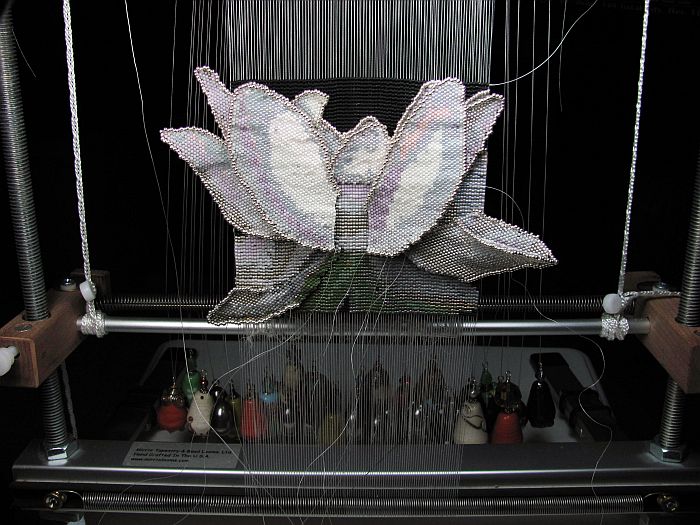
I named this Cell Phone Bag 'A Glorious Day' because the inspiration photograph was taken by Jean Upton, while she was on a walk/bike ride. The most appealing part of this photograph is the solid black background. I have been sharing stages of completion, but now I am glad to share completed pictures!

Below is a close up picture of the '3D Butterfly Wing', added as a focal to this panel.

The opposite side is loomed using the same color palette, of 44 different Delica Beads, but different Delicas were used as the predominate colors. My choice to keep the color theme going, had to do with how the fringe and strap are finished, reflecting both sides, of the cell phone bag.

Creating a spiral rope section, seems to be a good answer, keeping the strap strong. In this case, I used 10/0 hex cut, matte finish glass Japaneses beads. It spiraled up faster and offered that chunkier feel I wanted to acquire. The bead tubes carry out the same colors, as in both panels. Gems and Stones were also selected to match. I prefer to include sterling silver in between every bead, stone, gem or spiral, when I string up a strap.

As with many bags, cell phone or otherwise, they are more heavily used. Therefore, I always bead an epaulet, for each side. This way, I secure the four sides of the epaulet and attach the closed jump ring to the center. This gives a more security to the attached strap. I use jewelry wire to string my straps, ending with a lobster claw clasp. This can be removed, from the bag, for use as a wallet, or can be easily swapped out with an alternate handle. Notice that I also include three jump rings for the lobster claw clasp to hook on to, so there is additional strength.

A close up of the fringe shows how I used sterling silver caps. This, along with the opaque bicone Crystals, created the weight I was looking to acquire, making the fringe lay perfetly.

Looming a cell phone bag seemed to be something no one wanted to consider trying, thinking of all the warps needing to be managed. What I love about the loomed bag, is how they are supple yet sturdy and have no need to be fabric lined!
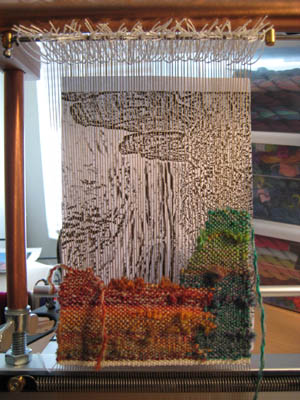
Wednesday, November 17, 2010

Social Market for a Mirrix

Well, the weaving is off the loom and the warp threads are tied off. Now I can start thinking about the additional fibers that will be integrated into the piece, as well as the beads. It definitely needs more texture and color and I think it’s going to be one of those pieces that has to be totally over-the-top in order to work. I’m still not a fan of the Ozark Handspun so I probably won’t be working with it again.

But, enough of this silly experimentation and down to serious business. I just received the Call for Entries for Small Expressions 2011 from the Handweavers Guild of America. Three pieces (less than 15 in any direction) can be entered and the deadline is March 7, 2011 so that gives me plenty of time. Unfortunately, this also reminded me that the deadline for the American Tapestry Alliances show Small Tapestry International 2: Passages is November 30, 2010. Oh well, theres always next year. I need a better system for tracking deadlines.

Anyway, the next piece that Ill be working on will be a more traditional tapestry for entry into the HGA show. Ill have the first cartoon done, the colors selected, and the loom warped and ready to start for Saturdays post.

Saturday, November 13, 2010

Social Market for a Mirrix

And now for Plan B. As I mentioned in the previous post, I wasn’t all that warm and fuzzy about the way the new weaving was turning out. So, I pulled out what I had done and started fresh with a new direction. This is much more what I had envisioned so I’m feeling better about the piece now.

Here’s what the beginning of the first weaving looked like before I dismantled it. Yep, that’s it… pink and lumpy.

I thought I would show you a picture of the warped loom with shedding device and heddles attached. The loom is warped with black C-Lon Fine Weight Bead Cord.

And here’s the new yarn I’m starting with. This is Maya cotton bulky yarn by Tahki Yarns in black.

And here’s where I’m at with the new piece.

The pinkish / grayish areas are sections of the Ozark Handspun from the previous piece that I’m using to randomly fill in areas. Once the piece is finished and off the loom, I will be turning it 90 degrees and embellishing with beads and maybe some found objects. I want the texture to be running vertically instead of horizontally because I think it gives the weaving more of a feeling of movement.