Friday, August 31, 2012

Everything Old is New Again…Plus Another Tip!

As I tackle the second No Warp Ends project in this Craftsy course, I am reminded of the first bead weaving I did many years ago. Back in the late Sixties and early Seventies, many young girls were obsessed with making simple little necklaces, bracelets and even rings using what we then called Indian seed beads. For years I kept my “Navajo Bead Loom” in its original box but of course, as I awaited the arrival of my new Mirrix, I naturally could not find the old loom. Since they are still widely available and cost next to nothing, I purchased a new one. I felt thirteen years old again!


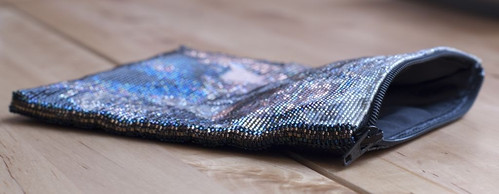
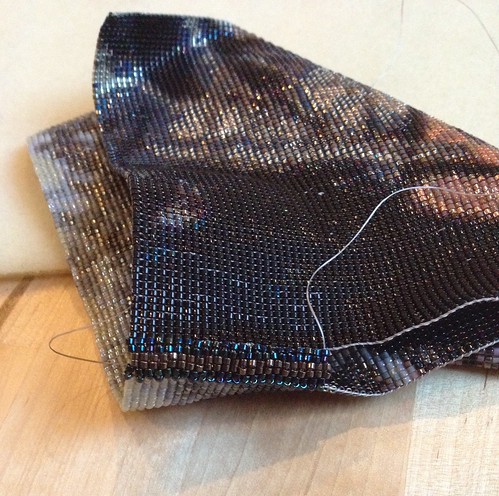
This no warp ends project uses a simple charted design much like my Sixties weavings did. Who would have thought that my crafting life would come full circle as it has? (If someone had told me back then that nearly forty years later I would again be making seed bead jewelry...) Fortunately though, someone had the vision to improve upon the original primitive bead weaving loom. I can tell you that it sure is a whole lot faster and more enjoyable using a Mirrix.

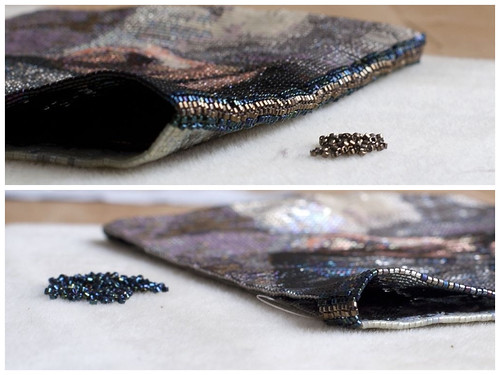
Like Claudia, I have a real problem following these simple little charts. I don't know why but if there's a mistake to be made, I'll make it. Of course, this involves a fair amount of UN-weaving so my progress is a little slower than I'd like... and alot more tedious. However, I persevere.


By the way, I have another tip for you. Although many of you may use bead mats, I have another idea for easy beading for when you’re not sitting at a table or otherwise on the go. I cannot take credit for this. I learned it while attending a sewing workshop with Natalie Chanin, the brilliant hand-sewn clothing designer for Alabama Chanin. (www.alabamachanin.com). Her artisans have created a "beading cuff" from a cast off cotton jersey sleeve. By applying heavy duty double-faced tape to it, tiny beads easily stick to it. Voila, beads right at your fingertip just when and where you want them. Easy, cheap and up-cycled, what could be better?


Try it and let me know how it works out for you.

And Happy Labor Day!

xxx, Karen 

Thursday, August 30, 2012

The worst is over!

I'm over the worst of it, yay!!! I sewed the lining on Friday, and also shortened the zip. I couldn't find a zip the right length, and the closest one wasn't the look I wanted.

zip

There was some redrawing of the measurements on the lining before i could cut it.

Anyway, I sewed the zip to the lining on the third attempt. Yes, that says the third attempt! That was after having a little trouble winding the bobbin! While doing all this, I was reminded of the fact I don't like sewing! But needs must so I gritted my teeth and got on with it. Sewing the other seams closed was easy enough. And, stitching the lining into the purse was also easy. I thought that would be a nice video to do.


Because I was working on a black background (the lining and zip) with black thread, I couldn't find a good enough angle to video while I stitched it in. So, I resorted to using close up photos. Hopefully they show the steps well enough.

Lining

Now, I need to do the handle and the fringe then I'll be done! I can't wait to see it all finished. I bought some Swarovski bicones, and what I'll be using for part of the handle. I went with the purse so I could pick colours correctly. Hopefully they will work out.

I managed to clear the loom this morning. So I can make a start on the Nelson Mandela bracelet. I'm just going to warp and make a start, with the face!! I just need to find one colour (DB357). I know I have it, just have to find t now!

Hopefully I'll have made enough progress to perhaps blog and share tomorrow. Thanks for reading and hope you enjoy the video.

Have a good evening!

Tuesday, August 28, 2012

Look Ma, No Warp Ends!


After previewing this lesson, I was actually a little nervous about getting started. Just when I was beginning to feel confident with the ease of bead weaving in the previous lessons, I would now have to actually do something drastically different. Those innocent-looking paper clips and tex-solv cord seemed more than just a little intimidating. Well, fear not. I’m here to tell you that like everything else so far in this course, the learning curve is swift and before long I was on my way.


I will admit to making good use of the thirty second replay button that Craftsyoffers. After several replays, I finally realized that TWO lengths of tex-solv were necessary. Duh! (This was also a good time to actually READ the course material provided.) Getting all the new cords adjusted and evened  out was a bit of a challenge but once the paper clips were in place, the warping was surprisingly painless. I’ve since watched my fellow blogger Noreen’s excellent video tutorial where she uses S-hooks in lieu of the paper clips. (http://tottietalkscrafts.com/2012/06/22/a-slightly-different-approach-to-the-no-warp-ends-on-the-mirrix/). I may try that next as my biggest difficulty was figuring out which direction to actually place the paper clips. Again, not a huge problem but using the S-hooks will eliminate that confusion. As Claudia promised, the actual weaving part is lightening fast and in no time flat, I had completed another beautiful fully beaded cuff.


Now who doesn’t love the final result? Really…no warp ends to deal with! This is just genius, don’t you think? The strength that using the wire warps is a bonus as it gives a very professional look. I also love having the option of choosing how to finish the bracelet with either the peyote clasp or by using an unusual or vintage button as I did. How cool!
 
Off to the hardware store to purchase S-hooks. I may never use real warps again.
 
xxx, Karen 


Saturday, August 25, 2012

Two more pouches for the Soumak Pouch Weave Along

I've been shooting videos for the weave along  that begins on September 2nd.
As I was shooting, I was weaving along on a couple of pouches.

Here they are:

A Stripey one, with some beads and other embellishments:
copyright Noreen Crone-Findlay
and the back:
copyright Noreen Crone-Findlay
I wove it with Lion Brand Bonbon yarn- cotton for the body of the pouch and metallic for the embellishment.

The size 8 beads along the sides are from Mirrix and the bone beads at the lower edge were in my stash.


The medallion on the back of the pouch is one that I snitched from a box of stuff that my daughter in law was going to give away. 
(She gave it away, but to ~me~ instead of giving it to 'anonymous' -  I can be shameless when it comes to pretty goodies! )

My daughter in law grinned at me when she saw the finished pouch, and said:
 'This one is yours, isn't it, Mum?'
'Yes! but how did you guess?'
She just laughed.
  I guess it's because I adore these colors and use them all the time!
...
I was concerned about this pouch:
copyright  Noreen Crone-Findlay
Why?  Well, because both my daughter and my daughter in law declared that they loved it and would love to have SantaMamma leave it in their Christmas stocking.

I didn't want to make two pouches that were exactly alike, so I had to have a big old think about it.

And, I came up with the perfect answer!!!!!
copyright Noreen Crone-Findlay
TADAH!!!!   I wove it up in the same colorway, but using the drop dead luscious wool yarn from the Mirrix kit   [LINK to purchase]
(and, please note,: I don't profit by raving about the delicious and gorgeous yarns I am using for these pouches, but I am just tickled pink with them, and VERY happy to say: WHEEEEEEEEEEE about them and to say: Yup... thumbs up, order and love 'em, too)   :o)

Here's the back of the woolie pouch:

www.kreinik.com supplied me with the gorgeous embroidery thread and edging cord for this pouch.
Here are the links for them:
The edging is 3/8 " trim:  # 170 Natural Pewter    
http://www.kreinik.com/kshop/product.php?productid=17023&cat=0&page=1

The embroidery thread is: Ombre: http://www.kreinik.com/kshop/product.php?productid=622&cat=0&page=1  1000 - Solid Silver
I love the combination of the soft loftiness of the wool with the sparkle of the metallic embroidery floss. The embroidery thread is soft and lovely to work with. Some metallics can be barky and sharky. This is soft and nooshy.

!AND! 

Happy dance!
and   ~whew~

My daughter in law (who happens to be an incredibly gifted and talented handspinner, so she is naturally inclined to be more drawn to wool),  likes the woolie pouch -

HURRAH! SantaMamma is so relieved! 

My girls will have their lovely pouches in their Christmas stockings, and they are 'sister pouches'.... similar, but each unique!  
Alright... time for me to get back to editing video.....  :o)
~Noreen~

Magnatamas, Tilas & Silk, Oh My… Plus A Quick Tip


I’m really cooking now. Finished the latest Affinity Bracelet in under thirty minutes and that includes warping! They’re just so easy. Using the no. 8 beads again makes bead weaving a breeze. There’s plenty of room to squeeze a needle and thread through without nasty mishaps like catching warps. The tilas are fun and aptly named- they resemble little rows of tiles. My favorites though are the magnatamas-they look like little pudgy off-centered donuts. Love ‘em. Although I’ve seen them at the bead shop before, I now intend to purchase lots more and play around with design possibilities. Anybody know why they’re named such? Just curious.

What I’m really excited about though is the ability perhaps to teach you all something…me teaching you, for a change. Many weavers might already be familiar with “fringe twisters” but in case there are some newbies who are not, read on.

3 Clip Fringe Twister

These magical little thingies are a life saver when you need to make lots of fringe. I first spotted them at the many sheep and wool festivals that I attend. Again, I guess they’re more of a fiber thing. Smart knitters use them regularly to assist in the tedious chore of finishing the fringe at the end of scarves. The most popular ones I believe are made by Leclerc although there are other brands. (http://www.leclerclooms.com/twister.htm). They come in various sizes and run about $25 depending on the size. Trust me, they’re worth every nickel. The one shown here is designed to make a three-strand fringe however if you only employ only two clips, as I do here, you can use it for the two-strand fringe necessary for this bracelet.


The how-to? Simply insert each strand of fringe into its own alligator clip. Turn the handle in the same direction as the twist in the thread/yarn. Count you turns until you’ve reached the desired crimp. Next you must place all strands into the same clip and turn in the handle in the opposite direction. Again, you should count the revolutions to maintain consistency between all fringes. When the twist in the resulting rope is to your liking release the strands while holding the ends together and knot. That’s it. (It takes longer to explain than actually do).


Perfect fringe, every time!


What’s wonderful about this tool is that you get tight consistent fringe every time. Although I was initially unsure if it would work on such a tiny scale as these bracelets, I was thrilled to learn that it works perfectly. No more twisting delicate fibers between your fingers or accidentally letting go. It’s really almost hands free and takes a fraction of the time as traditional twisting by hand.

(Note to Claudia & Elena: you should stock these babies. Very useful).

Off to the beach again. When you live on Long Island, you go to the beach. And haven't you heard? Summer's almost over. (sniffle sniffle)

xxx, Karen  

Friday, August 24, 2012

Furoshiki wrap technique to carry a small loom

Furoshiki wrap technique to carry a small loom


I rarely leave home without a small loom.
If I am the passenger in a car, I  weave.
If I have to wait for an appointment, I weave.
When in an airport or flying.... I weave.
If I am sitting, listening to my husband's Jazz trio/quartette/quintette, I weave.
I like to be able to to port along my small looms in  tote bags, backpacks or baskets.
But.... the warp strands and bobbins and needles can get seriously disarranged by being jostled in transit.
I have been mulling over the best way of protecting them while they are being trundled about.... and then it struck me....

By using the Japanese technique of creating perfect wraps and carriers from a scarf or cloth! :
FUROSHIKI  (link to a ton of ways of doing furoshiki wraps)
3 Mirrix looms wrapped with Furoshiki techniques
copyright Noreen Crone-Findlay
I always carry headscarves in my purse or bag, to use as instant tote bags.
The other day, it struck me that the perfect way to protect my beloved small looms when I am slipping them into bags or baskets for their travels, is to 'Furoshiki' them.
It works BRILLIANTLY!
I usually use square headscarves- and any size will work... smaller scarves are great for small looms or bundles of books and tools; larger scarves for larger bundles of looms and stuff.
But, you don't have to use scarves: This is a great upcycling opportunity!
You can use squares of fabric cut from old shirts or skirts or dresses :)
You can also use cloth squares to gift wrap presies. Do check that link at the top of the page. Impressive :)
Here's a video, showing how to use Furoshiki wrapping techniques to make an instant, customized carrier for your small loom:
The models in the video are my 3 smallest Mirrix looms.  I call them the Three Sisters.
I love, love LOVE my Three Little Sisters!  I have renamed them: The Mini is 'Molly Whuppie' (you can read her story in my book, Soul Mate Dolls), 'Vasilisa' (heroine of a wonderful Russian fairytale) is the name of the 8 inch loom, and the 12 inch is now known as 'Jane', after my beloved Jane Austen.
I do believe they quite like their travel wraps! :)
Here's the video that I made to show how I wrap my looms :
 :o) Noreen

Almost there

It's been a good week! I've made good progress on joining the sides of the purse. Since the last post, I've finished joining one side, and I'm left with about 1/4 on the other seam. And I have to say I like the way it's looking!

Untitled

It was also easy enough to figure out how to stitch the peyote section and base together so it's completely sealed on the 'corners'. I took some close ups for when I have to the other side, and for future reference. Those extension tubes for my camera are very handy now!

Closeup

I'm thinking about the strap/handle and fringe while I work. For the strap I'm thinking perhaps this. I'll leave you to imagine what it may look like :)


I haven't had time to work on those bracelets and the strip for the violin yet. I work an extra day from home now, so it's one less day of beading. But more money at least :) I've been waking up by about 7:10 these days to get some in before the minis wake up. I've also learnt to take (more) regular breaks. So now I (try to) bead for about 15-20mins then break for about 5-10mins. I find it hard to start-stop so much, but I shall just grin and bear it because it's for my benefit.

This morning as has become my routine, I woke early and worked on joining the side. I managed to do quite a bit but had to put away for work and then having my hair done. I would have gone back to it this evening but my thumb is feeling the strain!

I have a commission to start planning for. It will be another (colour) portrait of newlyweds. I will probably try and work on the pattern over the coming days. I don't know if I'm allowed to share it online so, erring on the side of caution, I will keep it hidden unless I'm told otherwise.

Hopefully the next time I blog the seam will be done and I'll be doing the lining. The part I'm most dreading as it involves a sewing machine :D That grin is pure front! But good enough I have enough lining material to make mistakes!

Tomorrow is an early start so I bid you goodnight. Enjoy your Saturday :)

Bead Weaving: A Love-Hate Relationship

Craftsy Class 5: Affinity Bracelet Variations


The second Affinity Bracelet variation uses 4mm crystals & hex-cut beads. Besides being entirely bead woven, it employs the technique of substituting a larger bead for two smaller ones in specific rows. As Claudia explains, one can always replace any two smaller beads with a larger one if the larger one is exactly twice as long and wide as the two smaller ones. Pretty cool concept if you think about it and it opens up a world of creative interpretation using a variety of beads. Of course now I can imagine obsessively trying to measure all kinds of itsy bitsy roll-y beads. (Thanks, Claudia). Then again, I suppose I can just eyeball them and hope for the best which is really much more my usual m.o. anyway. 


I admit to starting this project with a little trepidation. With all due respect to the fabulous bead weavers reading this (you know who you are. I won't mention my fellow blogger, Brenda's name here), I’m just not a big fan…not for myself, at least. Lots of blinding work weaving with microscopic beads and where’s the fiber anyway? By know you must know that I always need my beautiful fibers. For this reason, I predict that I will be more of a tapestry girl. I can’t wait to begin the Tapestry Cuff but I really must complete the lessons in their proper order and that one, sadly, is last.


Several missteps thwarted my initial attempts. I kept splitting the bead thread and piercing (or missing entirely) the warps. Very frustrating. The ability to count to six posed a problem as well. (Hey it was after 10PM when I started…first mistake). The other thing I learned about bead weaving is that you need amazingly good light. In fact, more light than I have in my entire house- at least at that late hour. Note to self: must save these projects for daylight hours only or suffer the consequences. Still, I forged ahead…straight through David Letterman. As Dave said goodnight, so did I. With a mere 16 bleary-eyed rows completed, I called it quits. “G’night folks,” as Dave says. Yeah, I’ll say.


Stealing some time from my lunch break the following day (who needs to eat anyway? Not me lately...but that's an entirely different blog post topic), I took my loom outside and was able to finally make some serious progress. I really love how the beads line up in this pattern and my choice of lime green silk warp matches my green 4mm beads to perfection. (Almost like I planned it but we know better). The four row pattern repeat, as we knitters would call it, is an easy one to remember and after a short while comes quite naturally.


I find that the near-instant results seen in these bracelets are incredibly gratifying. Within a very short period of time, you've completed another little work of art. Fabulous!

As I’m beginning to expect from Mirrix, this bracelet has turned out to be another winner. This really is becoming addicting.

xxx, Karen

Wednesday, August 22, 2012

Thank goodness it's over

It's amazing how I fill my time, doing something with my hands. The forced rest was painful (in more ways than one)!. For the first time in years, I was bored!!! Yes, bored!! I played games, read, played more games. And I was still bored! It's been a while since I've been stuck for what to do. The real issue is my hands were idle. I stopped ALL activity to really rest my hands. Luckily it paid off and a few days later I was back on the horse. I've never been happier to pick up a needle!

I've been spending time reweaving the warps on the purse. I even worked on it on the bus journey home from work. Once, a last sat near me was impressed by it. She asked to hold it and seemed to enjoy the feel!


Anyway, I finished reweaving the ends and started joining the sides. With this one, I decided on odd-count peyote for the join. I like the solidness and sturdiness it affords. I got an idea for the strap while searching online for Swarovski crystal beads and pendants. I'll have to see the element in person so I can work out some measurements.

Joining the sides of the purse

The fringe design is still eluding me. If anyone has any ideas I'd be glad to hear them. There is something I saw, but think t would be too chunky. I'll continue pondering on it, luckily there's still a little time.

I'll be starting the Nelson Mandela bracelet soon....or rather as soon as I empty the loom! So by Sunday it has to be freed up. I've got to buy one colour on Monday then I'll be good to go. I shifted the pattern down so the face would sit in the middle (thanks Noreen). But I've yet to decide what to do with the blank area above. Perhaps a bead soup could work.....I'll decide when I get to it.

I had a little shock when we got home from the beach on Sunday. My husband had cleared the 'cloakroom' and had put my violin in the corridor along with some other things that needed throwing away! It's a good thing he didn't do it that day, I would have been crying!! I've put it back where it was *sigh of relief*

So I have a lot of catching up to do. Hopefully Sunday I'll be more up to date. Till then, have a good evening.

Tuesday, August 21, 2012

Gold, Gold Everywhere!

Craftsy Class 4: Gold Thread & Hex Bead Bracelet

If I thought I loved the hand painted silk floss introduced in Class 3, that was before I discovered this gold plated "wonder thread" in Class 4. What IS this fabulous stuff? Claudia describes it as a silk base with real gold fused to it. Whatever it is, it weaves up fabulously and really does in fact look like the real thing. That’s the good news. The bad news: Don’t let this happen to you:

Gold Thread...Before


Gold Thread...After

Really, I should have known better. After all the various yarns I’ve wound, skeined, unwound, untangled, got-so-frustrated-and-thrown-away, over the course of so many years, you’d think I would have done a better job with this one. And it’s not that I wasn’t prepared. “It’s got a mind of its own,” Claudia warns. Yep, it sure does. (It’s like letting a tightly wound spring out of a small box). And it surely is one of the finest threads I’ve ever encountered- it’s nearly invisible. So now I’m warning YOU: take your time and be patient with this stuff because it is all so worth it. Once you do get it wound and threaded on the needle, it’s a breeze to weave with. In fact it practically weaves itself. And it is also very forgiving as it fills itself in almost magically. Just be sure to keep those six plies together. As far as the hex beads are concerned, after using the larger size 8s for the Affinity Bracelets, these smaller beads seem a bit more challenging but you’ll see that it’s nothing unmanageable. Of course, I had to add my own personal spin to the finished product by adding a little bit of purple/pink mulberry silk between the gold and the beads. I kind of like it, what do you think?  

The finished bracelet

Weaving at the beach...the best of all possible worlds!


So, Class 4…Just stay calm, keep at it and you’ll get a truly beautiful result. And be prepared for lots of requests from friends for this one. It’s a stunner!

Now onto Class 5. See you there.

xxx, Karen

Sunday, August 19, 2012

Oooh Claudia made gorgeous kits for the Soumak Pouches

Oooh, Claudia has made gorgeous kits for the Soumak Pouches!


Oh my word!
Claudia has outdone herself in making the kits for the Soumak pouches for the Weave Along in September:
copyright Noreen Crone-Findlay
Aren't the  colors and textures gorgeous?
I just went and picked up the text from this page: LINK
If you're a weave-along 8 participant get $10.oo off this kit with discount code:   weavealong8
This package goes with our Weave-Along 8 hosted by Noreen Crone-Findlay.

Learn more about the weave-along and sign-up here today.
Kit Includes:
-30 yards of 10 each of ten colors of  wool/mohair yarn
-12 x 6 piece of silk for lining
-A semi precious stone for a clasp
-100 gram tube of Navajo Wool Warp
*Please note, this kit does not come with fiber for the edging or a kumihimo kit to make one.
The kit can be purchased separately.
You will have 4 options for making the edging cord for the pouches: 
1- A beaded peyote stitch tubular cord.  If you want to make your cord with beads, be sure to add beads to your shopping list.  Either #8 or #11 work fine, depending on what your favorite size is. I used the #11.
You can order them from Claudia when you order the kumihimo kit and the pouch kit. 
By the way, you will be able to weave more than one pouch from the kit.
OR:
2- A kumihimo cord. You can order it from the link above.
OR:
3- A spool knitted cord.  LINK for the ordering information.
OR:
4- A twisted cord. I'll be showing you how to make a twisted cord with a spool and a crochet hook.
I am rubbing my hands together in delight, as I am having a wonderful time working on a ton of videos to make the Weave Along really fun and super user friendly.
There is a mountain of information, so I am breaking it all down into bites that make sense and are easy to refer to when questions come up.

Happy Weaving!
Noreen


Saturday, August 18, 2012

Mirrix Goes to Montauk

As it happens, my Mirrix loom arrived the day prior to our little holiday in Montauk. (I know you’ve heard of Montauk Point. You know, at the very tip of Long Island, NY?)  Well, I couldn’t leave her home alone, now could I? Certainly not with all that fabulous fiber haunting me from afar. So, unbeknownst to the family, I sneakily stuffed her into yet another canvas bag and she made the two hour trip to the beach. Here she is on the deck overlooking the Atlantic Ocean looking rather majestic, don’t you think?


Craftsy Class: Introduction & Looms

Claudia’s introduction, besides doing a great job of whetting one’s appetite, speaks for itself. Not much need for comment, I believe. The second “lesson” concerning various looms is significant particularly if you are not yet fortunate enough to own a Mirrix. (Notice I say yet. Don’t worry, you will). Prior to receiving the Mirrix, I fiddled with both a $10 craft-store seed bead loom as well as my Cricket, both with excellent results. They really do weave beautiful bracelets. However, tensioning problems as well as awkward warping renders them less than perfect. Learning to warp a Mirrix is a snap and the tensioning is a dream. I think the Volkswagen/ Mercedes analogy applies here; there’s simply no comparison. If you can, by all means, get a Mirrix!
  
Craftsy Class Lesson: The Silk and Bead Affinity Bracelet


I have a thing for silk… always have. It is by far my favorite fiber to work with, be it knitting, crochet, sewing or weaving. I love the tiny little crunch it makes when you fondle it which I confess I do. The vibrant colors that Claudia has created make all the difference in the final product, I can assure you. Not wanting to waste the precious silk, I practiced my first few Affinity Bracelets using lesser fibers- some pedestrian embroidery floss and even some commercially dyed silk floss. I can tell you that they can’t compare to the subtle color variations of Mirrix hand painted silk. (Pssst, Claudia, have you considered offering a silk dyeing workshop? Hint hint.)

I wish I could write about some problem or difficulty that I encountered while attempting to weave but honestly, it is so simple and enjoyable that I cannot find anything to critique. Ok, my selvedges are less than perfect and I probably could use a pair of magnifying glasses to thread that blasted bead needle but that’s about it. Come to think of it, I’m not crazy about that peyote stitch yet either but I’m sure that will improve with more experience. Heaven knows, I've got a long way to go.


When one chooses to forego an afternoon at the beach in order to stay back to weave, I think that’s really saying something. Here are my results. Whaddaya think? Not bad, eh.


xxx, Karen

Wednesday, August 15, 2012

Hello, Gorgeous!


For those of you too young to remember, this is precisely what Barbra Streisand uttered upon being handed her first Oscar statuette after winning the Academy Award for Best Actress. (I won’t embarrass myself by revealing the year…perhaps you remember? Don't worry, I won't tell.)


Whatever does this have to do with weaving, you might ask? Well, if you’ve ever had the joy of setting eyes upon your first Mirrix loom, this will pretty much be your response. It was surely mine last evening when I opened my glorious and much-anticipated package from Mirrix. And although I’ve certainly seen enough photos and videos of them, to hold a Mirrix Loom in my very own hands is quite a different experience. Trust me, they're absolutely gorgeous.


To back up a little...I must admit to my surprise upon learning that I had won the Social Market for a Craftsy Class contest. After all, I’m certainly not much of a weaver. And although I’ve woven a fair share of some lovely yet rather simple items on my Ashford and Cricket rigid heddle looms and even on a ginormous 7 foot triangle loom, until recently I had never heard of Mirrix Looms. I am however a Very...Serious...Knitter, having owned two different yarn shops over the last twenty years. During this time, I have taught untold numbers of classes to countless students of all levels and have blogged about the trials and tribulations of owning one’s own knitting shop. Just two years ago, after selling my most recent beloved yet truly exhausting yarn shop, I was fortunate to land my dream job as the Marketing Manager at Knitting Fever. Perhaps you've heard of us? We are the nation's largest importer and distributor of many fine yarn brands including Noro, Katia and Debbie Bliss. In this position, not only do I design knitting patterns but I often get to help develop the actual new yarns that will be brought to market each season. Very exciting stuff, I can assure you. So, if there is anything I do know fairly well, it is fiber.


Enter Claudia’s Craftsy class, Bead & Tapestry Cuffs. Upon first discovering it, it appealed to me immediately. Naturally, I was captivated by the unique fibers used in the Affinity Bracelets and of course, the magnificent Bead & Tapestry Cuff. Just one quick glance at the extravagant materials shown in the class promo, I knew I was hooked. Hand-dyed silk, golden threads and beads of all sizes and shapes. (Be still, my beating heart!) But I am getting ahead of myself…I must first finish opening this fabulous Mirrix package because there are LOTS more goodies in here to unearth. Stay with me while we embark on a fascinating, fiber-filled weaving adventure, won't you?                        

 xxx, Karen


Tuesday, August 14, 2012

Feel the pain and stop

Ive developed some stiffness in my right hand. I'm not sure if it's from weaving or just work and life in general. I don't really feel it unless I go to make a fist, stretch my fingers out or scratch!. It hasn't stopped me weaving. But what has is a recurring problem with the area beneath my thumb. I developed something like carpal tunnel syndrome shortly after the birth of my first child. I have since had it on and off. However, I noticed earlier this year that if I weave too much or for long periods at a time, I get pain in my thumb which travels downwards. No twinges or discomfort in the wrist, it's all in the thumb and the surrounding area. If I ignore it, it does become a nuisance so I have learnt to stop pretty much as soon as I feel any twinges. I bought this thumb splint which helps. But it's hard to wear it and weave - particularly if the metal is still in there. It's hard to get my hand behind the warps without slowly slotting it in - that just ruins my rhythm and becomes cumbersome! So I'll have to wait a day or two before I can do any more.


Anyway, having waffled on about why I can't weave, here is my progress so far. Not much has been done on the bracelet on the right. With the blues bracelet, I decided it would be easier to weave the pearls into the design once the sides are done. So now it's moving quicker and should hopefully be done soon, fingers crossed.

I've also made progress on the strip for the side of the violin. It's looking very pretty if I say so. I think I may also make some curtain ties using some of the designs but in different colours to suit the decor of the sitting room. I wanted to try advancing warps but it won't work because I started weaving at the top rather than the bottom. So that will be left for another time.


I'm thinking they would look nice as a camera strap as well. I think I'll make one for my brother, a nice surprise :)

Since I can't weave, I'll have to try and come up with some more designs! But hopefully I can show some progress by the weekend. Have a great evening!


Monday, August 13, 2012

Chalkboards are low tech dandy design tools

Chalkboards are low tech dandy design tools


Sometimes, I get stuck in the design process.
That’s when I need to give myself nudges that break up the mental and emotional constriction that is keeping me from moving forward in a project.
And, so, I reach for some of my favorite tools that help me to see things differently.
My chalkboards and chalk.

copyright Noreen Crone-Findlay
Eh? as we say in Canada :)
Really!  A chalkboard is a fabulous tool for knocking the design blechs sideways!
I have wondered about why they work so well for me and I think that there are a couple of reasons.
The first is that white chalk on a black surface reverses the way I normally see things when I am drawing.
This is invaluable, because it clears the deck of any pre-conceived notions that I had about sketching.
It’s like working with negatives instead of photographs. You really do see things differently.
And, if you are stuck, then that is really helpful!
The second reason why I love chalkboards so much is that drawing on a chalkboard is so playful.
There’s a real feeling of ‘little kid’-ness to them that is definitely very freeing.
You know that it’s not permanent… it’s just a bit of dust on black paint … so wheee…… draw, draw, draw!
If you don’t like it…. whoosh whoosh, wipe it off and it’s gone.
If only the rest of life were so easy!
AND… if you do like it, then grab a piece of paper and a pencil and copy the sketch onto the somewhat more permanent surface.
How did I get such a neat shape chalkboard?
Easy.
I drew the shape on masonite, cut it out and painted it with several coats of chalkboard paint from the hardware store.
I even like the scritchy sound the chalk makes when I am drawing.
Low tech is often a wonderful way of opening the doorways to creativity and imagination.
Try it…. you might like it :D
Happy sketching and chalky drawing!
Noreen
PS: Anne, who is one of my online friends in the Mirrix facebook group suggested that you take pics of your favorite sketches and load them into your paint or bead making programs.  I don't use those programs, so it didn't occur to me. 
Anne's suggestion also reminded me that I do take 'archival' photos of some of the sketches that I really like... sorry... I completely forgot to mention that!  Thanks for the reminder, Anne! :)