Friday, July 30, 2010

Looming the base

I have been sharing the steps of completing a "SLN", split loomed necklace. The base of my image is almost complete. I'll be looming another 15 rows before I start a technique that will bring this image to life.

This is the first time I have loomed such a large creation, on a Mirrix. So far, I think this loom was actually created for those serious bead loomers! Your beading doesn't feel stuck on a frame, but feels free and movable at every step! I look forward to how this loom will hold up for what I have in mind, while completing this SLN! [smilz]

Thursday, July 29, 2010

Breakfast list, Perspective, and Color

CloudsAt Convergence I took a full day photography workshop with Gregory Case. I now know what to look for in the camera that I choose, plus a lot of other things to do when taking pictures of my work. I’m sure it will require practice, which, of course, is the problem.

After seeing the Abstraction exhibit at the Georgia O’Keeffe Museum, I was reminded again of the nuances of color and perspective. The painting that I liked better was one of her seashells, but I can’t find a picture of it anywhere. It also was done in varying shades of white, gray, and black, similar to the painting below. The one below is also on display, titled, I believe, Abstraction, White Rose, 1927.imageThis mini poster is 14”H  x 11”W, and is part of the Georgia O’Keeffe Abstraction exhibition, currently on display at the museum. 

While I was looking for a copy of the seashell picture, I found the painting below from the Chicago Institute of Art. It’s all about perspective—and color!

image

Black Cross, New Mexico, 1929

Oil on canvas

99.2 x 76.3 cm

The Art Institute of Chicago Purchase Fund, 1943.95

Thanks to Kimberly for the breakfast list below:

  • Goldy's Breakfast Bistro - Boise, Idaho
  • Bijou Cafe - Portland, Oregon

Anybody have more to add?

Helpful Tension Options

I have completed further rows, based on my design for a split loomed necklace.

Looming 92 rows wide can be a real challenge. Many looms keep your tension secure and looming long rows of beads can be uncomfortable to loom. However, using the Mirrix can make a wide bead looming that much easier and more enjoyable.

The wing nuts, on each side of the loom, are able to be spun, releasing the warp tension, or visa versa. For this looming, I am able to loosen the warps so my hand can grab the entire looming making it easier for me to run my needle back through the rows. Once I finish a row, I can tighten the warp tension.

Lately, I have been watching other loom artists create some huge portraits, by looming wall hangings. If they would see how comfortable it is to use a Mirrix and have the availability to loosen the tension, they too would be interested! It makes everything much nicer!

The picture I am looming, may not be readable right now, but once I include some other beading techniques, 3D, Bead Tole and edging, it will all fall into place. I'll post pictures as I complete more of the SLN!

Tuesday, July 27, 2010

Where do you begin looming?

As I shared in an earlier post, I have strung my Mirrix so I can complete a split loomed necklace, using warp weights. I have just completed my first few rows.

I prefer to begin my first rows of bead looming at the 'top' and work my way 'down'. Others have mentioned they like to start at the 'base' and work their way 'upwards'. When you are planning a design to include increases and decreases, you must start the first row at the widest part of your pattern. Once that section is complete, you can then work upward, from the top and downwards towards a finish.

Notice how the warp weights are being used to hold the upper half of my looming. At this time, I need the warps to be stabilized for looming my widest base, but once I begin decreasing and creating cut work designs, I'll be moving these warps. That is where the 'weighted warp' idea will hold merit.

In one of my earlier posts, I attached the warp weights to the bottom of my looming. In this pattern, I attached them to the upper section of my loom, keeping the base of the warps secured, or tied to the loom. It has to be one way or the other, but not both. In this design, again, I am working my techniques to the upper sections. I'll include more photos as my design progresses!

Monday, July 26, 2010

Convergence I

I tried to limit my shopping at Convergence, but still came away with some irresistible items. But before going on, take a gander at the beautiful booth that Weaving Southwest set up. A picture cannot do justice to the wonderful hand-dyed yarns! Yummy, yummy!WeavingSouthwestBoothHere’s Teresa and Rachel Brown. Rachel is the founder of Weaving Southwest. Teresa Loveless is the current owner and the granddaughter of Rachel. Doesn’t Teresa look like she’s having fun with the Rio Grande spinning wheel?Teresa_RachelI had contacted Susan at Yarn Barn about buying some heddles for my Mirrix. She graciously stuck them in her purse for the trip to Albuquerque, and now I have not-homemade heddles for when I warp next.

From John Marshall I bought some Instant indigo . Since I likely won’t be using it soon, John recommends keeping it in the freezer. He is such a nice man and very generous with his knowledge and expertise.

I have previously bought some paper yarn from Habu without any idea of what to do with it. Below is a “paper” yarn from 100% linen. I have the gold and red.Wide PaperWidePaperColorsAfter looking at the yarns again and seeing others that appealed, I have decided that I will make an unplanned textured tapestry piece on the Mirrix. The picture of the yarn below comes from Habu Textiles. On the label it says: Vegetable root sizing silk. Below is the quote from the Habu website about this yarn.

Very plain, but with a beautiful sheen. This yarn dyes very well and works perfectly as a warp yarn. It is quite springy, so suited for a sculptural knitted pieces or even basketry.

Paper

This is a
"paper" yarn. A small pieces of linen paper is sandwiched between the nylon core.

PaperTexturedWidePaperNavy

     
If these yarns work out, I may get some that I can dye in small sample sizes. However, there will be no time to warp the Mirrix for a few days, plus I have one more Text weaving to try before cutting the current warp off. After being gone for many days, the coming week is full. One of the items on my list is to pick wild mustang grapes. It’s jelly time!

Sunday, July 25, 2010

My Mirrix is a work horse!

I am thoroughly in love with my Mirrix! I have been wanting to create a very substantial split loomed necklace, for sometime. The 16inch Mirrix is perfect, for what I plan to create. I will share my progress here on the blog, but stay with me because some of my ideas will be new techniques. If they don't work out, I won't photo til they do!

My Mirrix is strung with 93 warps. I included the extensions, longer foot pediments and warp weights.

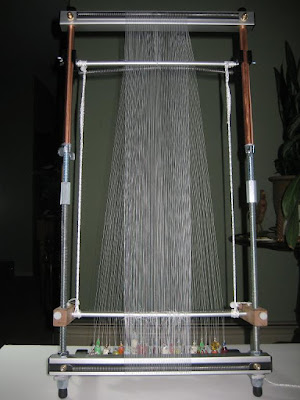
My design is 92 beads wide. Therefore, your loom is strung one warp more then the number of beads in a row, 93 warps. The center 17 warps are going to handle 16 beads of stable looming. I will explain further as I go along, then it will all make sense.

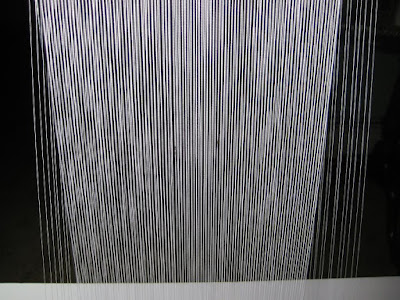
Notice the black marks on the two warps, in the picture above. This is the outside of my 16 beads. For now, I am only going to loom the widest portion of my piece, a split loomed necklace.

My design idea includes some 'cut work' into my looming and 'wavy edging'. Therefore, I need to include 'warp weights'. The warps are secure at the base of this loom, but are brought over top and a 'warp weight' is attached to every two warps. The Mirrix is so great, because I was able to 'increase the height' to handle my pattern, and the warp weights are secured in between the additional springs that come with the Mirrix.

These warp weights were custom made, especially for this method of looming.

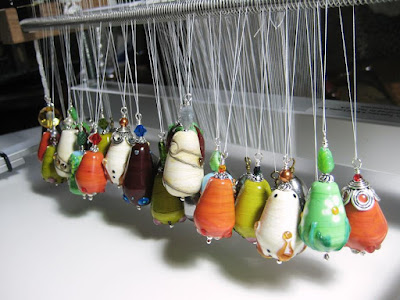
Many designs were discussed, but this is the best design to handle some very creative ways to loom. These warp weights, along with a tutorial to create 'cut work' and 'wavy edges', can be ordered from Venessa Hearn at Bead Up A Storm

I hope you will stay with us for me to share how the Mirrix, and these warp weights, can create some of the most intricate looming! For now, I'll be adding my longest row of beads, to start!

Wednesday, July 21, 2010

Color

I always think about color, probably constantly. Combinations that I like, colors to weave, a striking photograph. The Modern Art Museum of Fort Worth posted this on their Facebook page. Now, the blurb is not what caught my attention, of course; it was the PURPLE!

HAROLD AND THE PURPLE CRAYON:
Based on the classic book, these adventures star Harold, an inventive and curious toddler with thoughts, desires and feelings typical of any child his age.Purple-Crayon

Color Schemer

ColorSchemer2Color wheels are ubiquitous. Most of us have used them. Many have studied color theory extensively. I have to admit that I have not had that opportunity and often I regret that. However, as a friend of mine said, every time she thinks about color too much, she doesn’t like what she’s done. I have those same feelings and much prefer to go by my gut, or more politely, instinct. Or maybe just call it going by the seat of my pants. That is a saying, right? That’s not to say that I don’t use color tools. I do. I’ve mentioned my favorite computer program before, Color Schemer. With this program, one can take a photograph and find the colors in the picture. One has the ability to choose a different area if the color shown isn’t quite right. I know there are online programs, but this is the one I like and use. In fact, Color Schemer has an online version also, but I’m not sure if it’s as full-featured as the one on my hard drive.

Color-Star I also like Itten’s Color Star, even though Color Schemer does all the same things. With the Color Star, I can be seated at my design table and pull up some Color-Aid papers to go with combinations on the Color Star. But whatever the Color Star shows, and whatever Color-Aid papers are pulled out, the “gut” still rules. By the way, Color-Aid papers, which have color screen printed on them, are NOT inexpensive, and it used to be that they were difficult to fine. May art suppliers like Ultrecht have them, and I noticed that even Amazon carries a set.

image What made me start thinking about color is this blog post about purple and orange—maybe because I love those colors also? The above color combination came from Terri Stegmiller’s blog post.

Since I keep finding more stuff with color I love, this will have to continue to another day.

In the ikat-tying world—Color is a little iffy. That is it never exactly turns out as anticipated. More about that later, also.

In my Mirrix-weaving world—Color is determined by the butterflies and other leftover hand-dyed yarns, which also affects what I weave.

Website: http://sherriwoodardcoffey.com
Blog: http://sherriwoodardcoffey.blogspot.com
Twitter page
Facebook page

Tuesday, July 20, 2010

Thank you, Christina!

Our fabulous blogger, Christina Neit, is officially finished blogging for us! Thank you, Christina, for a fantastic three months! (Don't worry, though, she still has a few more things she wants to post!)

Check out her website: http://goodquillhunting.com/

We gave her a little end-of-project survey yesterday. Here are the results!

_____________________________________________________
How would you rate your overall Mirrix experience?  A++++

What did you like best about it? The quality, the size (Big Sister) and getting to know a loom all over again, but the top shelf always 'tastes' better LOL

What (if any) faults did you find in it? Nothing at all! Seriously!

What would you change about "Social Market for a Mirrix" for next time? Nothing! On top of my regular beading, getting into Galleries, custom orders, and with (Maine too short) Summer here,  you have been very very reasonable and flexible with me!!

Did you find the criteria for "Social Market for a Mirrix" to be too stringent? I was a bit worried about fulfilling my obligation (would be excellent for New England Winters) and I still feel like I owe you! 

What was your favorite piece created on the Mirrix? I think I liked my choker the best, http://goodquillhunting.com/images/Talutah.jpg , maybe because I sold it so fast or maybe because I had designed it several years ago and I brought it to a finished project. I will make another down the road.

What is your favorite thing about the Mirrix? Again, the quality!

What is your least favorite thing about the Mirrix? Figuring out how to finish off the warp threads ;)

What plans do you have for weaving on your Mirrix in the future? Dave's belt next, starting tomorrow night! Then a guitar strap, then I want to try some fiber!

Thank you SO VERY VERY much for a most amazing experience, one I have only dreamed of! It has been a wonderful experience overall and it was wonderful to meet two terrific people!!! Opportunity of a lifetime! I was, and still am, very honored to have been chosen thank you again!

Chris

Monday, July 19, 2010

Deciding what part to weave

Sometimes I doodle around in my sketchbook and come up with an idea for weaving, but it may be too large or I may not really like the whole thing, but do like a small section. Sometimes there may be a photograph that has an element to incorporate into a weaving. I thought about this when I ready something posted on the Tapestry 2005 Yahoo group about using a frame to decide on what to weave. I do the same think but it’s not a frame. I bought as inexpensive piece of precut matting as I could find and cut it into to L-shaped pieces like the ones below. Mine are white, but of course, white wouldn’t show up here. With two pieces I can slide them around to different sizes, overlap them if necessary, and am not even limited to a rectangle or square.

Framing On Elaine Duncan’s website, you can see her process of deciding which section of a photograph to weave. The link to the complete post is here. Elaine is working on a small- format series of tapestries called Art in Nature on her small copper loom. Of course, the Mirrix would take the place of the copper loom for me. While you’re there, take a look at Elaine’s tapestries. They’re gorgeous!

Website: http://sherriwoodardcoffey.com
Blog: http://sherriwoodardcoffey.blogspot.com
Twitter page
Facebook page

PO Box 123305, Fort Worth, TX 76121, USA

Friday, July 16, 2010

A face next?

I’ve been thinking about weaving a face next on the Mirrix. Not a realistic face, but a bright, colorful one of bright not-natural colors. For the hair, I envision coils of yarn in several colors, somewhat Medusa-like. I’ve done coils before—I just don’t remember how I did them. Maybe if I can find the sample, I will figure it out. But about the face, as I’ve mentioned before, I’m not sure about the fiddly small parts, things like eyes, mouth, etc. All necessary parts if you’re going to do a face! With faces in mind, I did a Google image search for faces. Well, folks, there’s lots of images of faces out there!PaintingThere’s this one by Belinda Eaton.

Or maybe something with Photoshopped like the one below, except with brighter colors. The link for this one is here

Photoshopped

And there are many Faces of Africa photos. The one below has its source listed as a caption.

Africa

This one came from National Geographic. I love the elegance of the women in these photos. And the hair is kind of what I’ve been talking about doing, but longer and more of it—and of many colors.Aftrica2 And, I guess I could always adapt the pumpkin face idea.

Pumpkin And here’s my own computer creation. Maybe if I make the eyes bigger and only make a single slanted line for the nose, the fiddly parts will be simpler. In the meantime, look at this tapestry by Emöke-emöke. Go to her website, scroll over the pictures to see the texture in her work. Really very interesting and beautiful. And the coils—love them!

Face

Emoke

Website: http://sherriwoodardcoffey.com
Blog: http://sherriwoodardcoffey.blogspot.com
Twitter page
Facebook page

Wednesday, July 14, 2010

Amy’s Work

Despite having a really hard couple of weeks with personal family tragedy, Amy has been working a little on her Mirrix project. I know from my experience with a death in the family, concentration goes out the window, so Amy is doing really well to be able to weave at all. If you look at the right picture in its larger format, you can see what she is doing with the beads. I really like the texture of the various yarns she is using and the way the beads outline the curve of the white on the upper left. And besides the “shiny” of the beads, Amy has used what looks like shiny, metallic yarns. In the left picture, you can see how she’s going about the process, the tray with her beads, etc.Amy_Work2Amy_Work


Below is a picture of the blue yarn all tied up for ikat. Before I removed it from the board, I tied two labels of cut up Tyvek envelopes at bottom left and top right which say:

Board #2 Bottom left

Board #2 Top right

Ask me how I learned that this labeling is important! This is important, along with the twining to keep each peg section in order. My first attempts at ikat were chaotic to say the least. I am now working on the red sections.

Blue_ikat_board_2

Take a look at the pictures from the exhibit below. I’d be interested in which one you like best, if any. There are several that fascinate me, like the ones called Mane and Spice Skulls. Interesting concept and works.

Dead or Alive: Nature Becomes Art

Website: http://sherriwoodardcoffey.com
Blog: http://sherriwoodardcoffey.blogspot.com
Twitter page
Facebook page

Tuesday, July 13, 2010

All 7 Complete

Hi everyone! I have finally finished all 7 bracelets from my 'One-A-Day series'! I will be posting them all individually on my website for sale, hopefully tomorrow. I still have the brow band to complete for my Daughter's horse. I need to get the actual brow band for a fitting and she has been away at camp. I was going to do a guitar strap next up, but I have yet to receive the leather 'blank' from my Son, so I am doing a belt next. Here is the photo of all 7 finished bracelets....one for every day of the week ;)

Monday, July 12, 2010

Text, Science, and Matisse,

Spiral_close-upI’ve been thinking about the text and weaving. In looking at the soumak pseudo spiral above, this may be the best method of making text. Curves are much easier to obtain, and one might even get a cursive-type of writing. But I really wanted wider letters, so I tried the what’s shown below. Before deciding what to do next time, I will have to change the orientation of the letters before weaving. Then I will also probably try some blockier type of font, maybe something like this, without the little curlicues at the bottom of the t.

Text

   Text_x

Text2


Imagine working for seven years on the same project! Now I know that Matisse was working on other projects at the same time, but gee, don’t you just finally say enough already? In the NY Times, there is an article about how the paintings of Matisse evolved over time—not the usual study from one painting to the next, but the study of one painting and how it changed to the final product. Of course, this type of reflection that brings change to a project is not possible for most of us weavers. How many looms with unfinished projects do we have room for? However, I’m sure we’ve all looked back at a finished work and thought how we’d do something differently. Maybe that’s what leads to a series. But is it something we’d do differently, or just an advancement on the original idea?

Succession H. Matisse/Artists Rights Society, New York

“Bathers by a River” went through a seven-year evolution as Henri Matisse continued to make changes, which can now be traced by curators using X-ray technology.

The following is a quote from the article about how this exhibit came about and the process of studying the various works.

The exhibition’s organizers, Mr. Elderfield and Stephanie d’Alessandro, the curator of modern art at the Art Institute of Chicago, where the exhibit was first shown, focused on 26 paintings, drawings and sculptures, which they examined with new digital imaging techniques, laser scanning, ultraviolet illumination and up-to-date computer software. They also tested paint samples and studied fresh material unearthed from the artist’s family archives in Issy-les-Moulineaux, a Paris suburb.

Website: http://sherriwoodardcoffey.com
Blog: http://sherriwoodardcoffey.blogspot.com
Twitter page
Facebook page

Friday, July 9, 2010

Real life steps in

Real life brings allergies--I didn’t get as much done as I had planned. Real life has a way of interfering sometimes. Probably because of the almost daily rain of the past week, my allergies have really kicked in. I can just imaging the rampant mold floating around in the air, multiplying as we speak. This is July in Texas? However, here in this part of Texas, we hesitate to complain about rain, since we get desperate for it in the summer. And, I really do love rain—just don’t know what blew in with this latest front that has brought us moisture! I shouldn’t complain; I haven’t had any problems with allergies in years, but still … who wants to feel bad?

Real life event #2—the tread on my tires was getting pretty thin, and you know it HAD to be bad for me to even notice tires! When I last had the car serviced, they told me the tires could probably go until the next service, about 5,000 miles, but the tires worried me. In doing the price-checking/research, I discovered more about tires than was even imaginable. Speed ratings. Rolling resistance. Summer tires. Winter tires. All season tires. Who knew? Since I have a hybrid, some of these things are more important than others.Text_x

I am hoping that the allergies abate enough that I can take advantage of some of the special Members’ Month at the Kimbell. I especially want to go the the Omni Theater for the Van Gogh film. Sigh heavily, feeling sorry for myself…maybe tomorrow.

How disconcerting is this—the NYTimes article about spy exchange. Is this a John le CarrĂ© novel or what?

Website: http://sherriwoodardcoffey.com
Blog: http://sherriwoodardcoffey.blogspot.com
Twitter page
Facebook page

Thursday, July 8, 2010

Text

Text2The text that I am attempting to weave is similar to the above, but with thicker lines, and believe me, it is definitely a work in progress! The T and the E are complete. I am weaving them with the T lying on its side, but am wondering if the direction would be better if I had started from regular “reading” direction. I thought I’d need fewer butterflies with the sideways weaving, but it didn’t work that way. Any experience weavers want to comment? In the picture below you can see the outline of the next letters to be woven drawn on the warp with a Sharpee. Please keep in mind, this weaving is purely experimental, and I am not endorsing the design or the quality of the weaving! It’s a little embarrassing to even show this stuff!TextThis is the last square to be woven, then I will cut off and warp again. I have to admit that I’m a little nervous about warping again, considering all the problems I had. At least now I know what a warp is supposed to look like on this loom. One thing that I’ve definitely learned here—I am not a weaver of small fiddly weaving. I was thinking that I would weave a bright, colorful face next that would cover the full width of the loom, but I’m afraid the nose, etc. will just be more fiddly stuff which will require lots of butterflies (or bobbins). What to do, what to do. I have a friend who, after taking a weaving workshop, says that it’s always beneficial to learn what you DON’T want to do. Maybe that’s part of my lessons here. Maybe I have a minimum size to be content with weaving. Just thinking out loud…

Website: http://sherriwoodardcoffey.com

Blog: http://sherriwoodardcoffey.blogspot.com/

Wednesday, July 7, 2010

Bead Color Intensities

I recently graphed a bead looming pattern of the classic subject, 'Piano Keys'. This is a good time to offer some of my thoughts about creating a pattern for bead looming. Here is the looming, still on my loom.

From the first look, you can see this is not a standard, straight on shot of a piano key board. I wanted to make it different then what is usually seen, but still recognizable. After deciding the angle, the piano keys on a chamfer, I had to think about the shading aspect.

Looming patterns have to consider not only the bead colors, but the bead finishes as well. The darkest finish in your bead pallet is the 'gloss' or 'opaque' line of finishes. Notice the blacks in this close up picture below.

The opaque black reflects a darker color then the matte black. This equation is the same for every color. Not only do the opaques show darker, but ironically the transparent line of bead colors also show darker. A crystal white shows up almost gray next to an opaque white.

Another aspect of loom pattern creating is the 'intensity' of the colors, next to each. I chose an 'ivory color Delica bead' for this looming of piano keys, to sit with the black. If I would have used a stark opaque white with the black, the gap of intensity would be overwhelming. I would have lost a dimension in my pattern. Therefore, remember that a dark and light color bead, looming within the same pattern, should have a closer gap of intensity. Here I used an 'ivory' instead of the 'white'. In my bead cup, the ivory looked too dark for the white of a piano key, but next to the black, it looks very white and you can notice a nice balance of intensity.

Practice looming some bead color intensities on your Mirrix. Get a feel for using darks and lights in a different manner then just to fill a color space. Remember how each bead plays a part, when loomed next to each. I'll continue offering some ideas about getting the most from your Mirrix Loom, but sharing some thoughts on bead colors can only enhance your enjoyment!

Text and ikat

No, not text and ikat together, but it could be done. Hmmm…maybe that should be next…

I played around with text in Word, but of course I only printed it out for a cartoon and didn’t save it! Reinventing the wheel here. I used the Word Art feature to copy, paste, and play around with different fonts. When you use Word Art, the text enters the document as a kind of clip art, so you can drag the corners and center to manipulate the text the way you want. Who knows if what I weave will look anything like the intended font. It will be a guide only to getting text into a weaving. This will be on the next section of my Mirrix project, the last square. I plan to do some more soumak with this.

clip_image001

clip_image001[4]

clip_image001[6]

Last week a new chair PurpleChairarrived in my house, via my car from Office Depot. So far, I’m thinking this is pretty nifty. I’ve been needing a chair for using at the ikat board so that my back does not get so stiff and sore. I saw this one in the store—but couldn’t find online :(—and loved it first because, okay, I admit it, I’m shallow—it’s color! Price was reasonable too. When I went to buy it, they explained to me that it is pink with two additional chair covers, chartreuse and purple. Unfortunately, it comes in a box and has to be assembled. I’m loving it so far! The only drawback is that the casters can gather up yarn and cut off ikat tape pieces. Just have to adjust how I do things.

 Blue-IkatThis is board two for the blue section of the ikat piece that I’m working on. After this one is wrapped and tied, I will move on the the red section. There is a temptation to measure and tie several ikat projects at once.  Below is an in-progress picture, on which, if it will load larger, there is some explanatory text. And you can see the pile of ikat tape ready to be used on the right. The portion show that is already tied is in 1/8 increments so that the design will appear more rounded when woven. At least that’s the plan!BlueIkatwithYellow-tape

Website: http://sherriwoodardcoffey.com

Blog: http://sherriwoodardcoffey.blogspot.com/

Tuesday, July 6, 2010

One-A-Day Bracelets Update

I don't mean to be slack, beading like a crazy woman and then the holiday showed up, so I inadvertently took the weekend off from any beading.
I have finished all the loom work for the One-A-Day pieces and as of today, I just finished one cuff completely. I did it so I didn't have to weave in all the threads, and it was so much fun not to have to worry about that!
Here are all the pieces finished and on the loom:


I have some nice thin leather (actually a recycled pair of leather pants) and I cut it out to fit my loom work, plus some length for the snaps. I put on my top snap and then I glued the end threads down, then snipped them off. Then I periodically added glue to hold the piece onto the leather. O took a needle and thread and started doing a 'whip stitch', every other space all the way down both sides to adhere the beadwork to the cuff. Then while I still had thread on, I decided to give this piece a picot edging, so went down both sides for that. Then I added the snap on the other side, rounded the leather edges and I was all done. I am very happy with the results and equally as happy to not have to weave all those ends in ;) Here is the finished result.


I now have to finish those up, and the horse brow band for my daughter, then it looks like a guitar strap will be born...and maybe a belt after that.