Tuesday, July 31, 2012

Slow and steady wins the race

I've managed to do a little joining on the panels of the purse. When I get a chance to sit down and do any, I get into a rhythm and it goes quite smoothly. But overall it is a little slow going. I've made the mistake of weaving into the wrong space, and had to pull out several warps before i could continue.

Joining panels

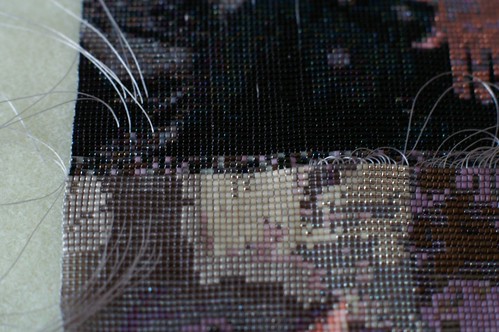
I thought it would be a good technique to show, so here is a video demonstrating how you do the join. The principle is the same as for reweaving warps. I hope the video is clear and it's easy to understand.


It's starting to look good though, so I shall soldier on! Of course I'll have to do this for the warps on the top edges as well. Either that or knot. I have decided I will line the purse, so will think of how to handle the warps along the top edge so I don't have to reweave. Once I'm done with the join (hopefully by Friday night time allowing), I will then be able to go and buy the lining. I want to be able to try it out rather than go with what I think would go well with it.

The other things to consider now are the fringe and the side joins. I'm thinking joining the sides using odd-count peyote. Square stitch could work but I think it would be a little slower to work up. Another option could be to loom two strips and join them on. For the fringe, I have an idea I would like to try for the shape and layout. I'm thinking Swarovksi beads of some sort, though that sounds rather vague!. In any case, the plan is to browse some sites of bead shops and see if I can find something that catches my eye. I'm open to ideas if you want to make any suggestions.

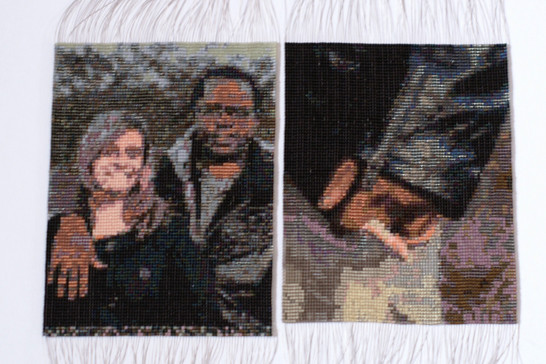
I received all the beads for the Nelson Mandela bracelet except for two. I don't know f I an make a start as yet. I still have to edit the pattern. But hopefully the loom will be wiped by Sunday. There's another portrait I need to work on - its on my large homemade loom. So much to do and so little time!

Good wishes for the rest of the week, and I hope you enjoy(ed) the video!

Sunday, July 29, 2012

And CUT!

It's off the loom!!!! And it feels lovely in my hands. Yesterday I finished weaving the photo bracelet that was on the other side of the loom. I then had the boring (self-inflicted) task of reweaving those pesky warp ends. Yes, once again I ignored my own advise! When will I learn to weave them in as I go??? Anyway, I finished weaving in the ends today and cut it (and the two bracelets) off the loom.

I haven't looked at or touched the other panel since I finished weaving But they were quickly dealt with. Once I get into a rhythm it's easy and not as boring! So here are the panels side by side after being cut from the looms. I think I made a mistake - the row number doesn't seem to tally. If you exclude the 3 rows (of bead soup) I added to form the base, it seems the panel on the right I short by 1-2 rows. The extra will just have to form part of the base. I'll align them properly once I'm joining the sides.

Panels for the purse

As mentioned before, the plan was to weave it as one large piece. However, my large loom wasn't free. So the solution to this little dilemma is to join the bottom of the panels.

The method is the same as hiding the warps so is easy. I've already made a start. I will try and post a video on Tuesday. Fingers crossed I get a chance to record it in silence. If not I'll just remove the sound. Hopefully it will be clear nonetheless.

Here are the two bracelets I had on the back of the loom. The black and white is awaiting edging and some extensions before the clasp is attached. The photo bracelet is also awaiting edging then the clasp. I'm hoping I can complete both by the weekend. I've enjoyed having multiple projects on the loom. I'll definitely be using that feature again!

bracelets waiting for extensions, edging and clasps

I ordered the beads for the Nelson Mandela bracelet. I'll have to do some editing to move the face to the centre rather than what will be the back. Then I can make a start. I'm thinking I should also try and make a start on the violin project too. Perhaps I can try seed beads instead of delicas. I'll see what I have in my stash.

Meanwhile happy beading, weaving, reading and a good start to the week.

Wednesday, July 25, 2012

Tips for quick and easy heddling on Mirrix looms

Tips for quick and easy heddling on Mirrix looms

I love how easy it is to warp the Mirrix looms.
I’ve found that there are a few things that can make the process of attaching the heddles go quick as a wink.
Efficient is good!  :)
copyright Noreen Crone-Findlay
The first thing that I do, after I release the warping bar from the blocks and turn them around, is to slide a piece of cardboard or masonite between the layers of warp strands at the front of the loom and the back of the loom.
It sits there, in the middle, blocking the distracting view of those warp strands at the back of the loom. :)
Then, I use a shed stick that is at least as long as the width of the loom to pick up every other warp strand.
copyright Noreen Crone-Findlay
Then, I flip the shed stick on it’s side, with each end being supported by the shedding device blocks.
I now have 2 layers of warp strands because of this shed being open.
So, to keep the back warp strands out of view, I slide a ruler or strip of cardboard into the open shed.
Bliss! Now, I just have one set of warp strands ready for the heddles- Yay!
This makes things sooooo much easier!
I like the center brass knob of the shed changer to be as close to the exact center of the warp strands.
So, I count how many strands I need to attach to the rod, and divide that in 1/2.
I place 1/2 the heddles on 2 of my fingers, and 1/2 on the other 2 fingers.
copyright Noreen Crone-Findlay
I loosen the heddle rod and slide it along so it’s about 2 inches/5 cm from the edge of the warp strands.
copyright Noreen Crone-Findlay
Then, I reach behind the warp strand with a crochet hook, pluck a heddle off my fingers, and pull it behind the warp strand.
I catch both ends of the heddle loop and pop them onto the heddle bar. Slide the bar along as you go.
When I run out of the the first clump of heddles, I should be half way along the warp strands.
I work across , picking up all the strands, and attaching them to the heddle bar, then tighten up the little nut that holds the heddle bar in place.
Remove the shed stick and ruler, then rotate the heddle bar, sliding the heddles down the warp strands.
Turn the shed opener enough so the heddles open your first shed.
copyright Noreen Crone-Findlay
Use the shed stick to pick up the warp strands that are between the warp strands that you have just heddled.
Turn it on it’s side, insert the ruler, and repeat the process.
Check to make sure that all the heddles are securely attached to the heddle rods.
When I was making the video, one little bounder escaped, which was actually a good thing.
This allowed me to show how to capture the escapee heddle and tie it back in place.

copyright Noreen Crone-Findlay
Remove the shed stick and ruler and check the sheds, then attach the handle or treadle and Voila!
You’re ready to weave!
Here’s the video:

Happy Weaving! :D

Sunday, July 22, 2012

Warping Mirrix Looms with Loom Extenders

Warping Mirrix Looms with Loom Extenders

Loom extenders for the Mirrix looms are sooooooo neat!
You’ll need to make a few adjustments when you are warping the extended loom.
Your best friends when warping the extended loom: Two chairs that don’t have upholstery or cushions:
copyright Noreen Crone-Findlay
Place  the chairs as far apart as possible:
copyright Noreen Crone-Findlay
This leaves a gap that allows you to easily pass the ball of warp around the loom.
You could use 2 small tables if you would prefer, but I like the height of the chairs.
The loom is still happily very stable when it’s extended.
Amazing, isn’t it?
That’s great design for you. :)
One of the other things that I have found while weaving on the extended loom is that the weaving can pull in on you.
So, to rectify this, take 2 rubber bands, and 2 paperclips.
Open the paperclips, fold the rubber bands around the side bars, and squeeze the shorter end of the paperclip closed.
copyright Noreen Crone-Findlay
Hook the larger end of the paperclip through the selvedge, about a half inch below the fell line.
Make sure that the end of the paperclip is towards the back of the loom, as this makes it be less of a snaggle hazard.
Here’s the video:

Happy weaving! :)
Noreen

Saturday, July 21, 2012

Setting up loom extenders on the Mirrix loom

Setting up loom extenders on the Mirrix loom

Normally, I tend to prefer small looms, but I have just fallen in love with using  loom extender bars on the Mirrix loom.
copyright Noreen Crone-Findlay
It’s really hard to convey how tall the ‘Alice in Wonderland’ version of the Big Sister 16 inch loom is when she’s got her stilts on.
With the extenders, she is 40 inches/1 m tall.
Now, that’s tall!
This means that you can achieve lots more weaving with one warp up.
(I’m working on some really fun stuff with my Big Sister Stiltie! So, stay tuned!)
My husband bought me the components for the extenders at the place he buys parts for our ancient tractor, so I didn’t have instructions on how to do this.
So, I had to figure it out for myself.
I found that there are a few tricks that make the set up easier when adding the loom extenders to your Mirrix loom.
copyright Noreen Crone-Findlay
First, lift the top of the loom off the side rails and set aside.
copyright Noreen Crone-Findlay
Unscrew the thumbscrews from the threaded rods, and screw them onto the extension rods.
I screwed them on so they were 5 inches/12.5 cm from the top end of the extensions.
Put the washers back on top of the thumbscrews.
copyright Noreen Crone-Findlay
Screw the coupler to the top of the loom rod.
copyright Noreen Crone-Findlay
Hot tip: Place the end of  a tape measure inside the coupler so you can watch to see that you have screwed it on so it is half way onto the lower rod.
I had my doubts about how stable this was going to be, because the coupler seemed wobbly to me.
copyright Noreen Crone-Findlay
But, I went ahead, and screwed the extension rod in anyhow….
copyright Noreen Crone-Findlay
And, then, when I tightened it up by hand, I was amazed at how it was suddenly rock solid!
WHEEE!
This is good!
Wobbly bad!
Solid- GOOD!!!
Repeat for the other side…
copyright Noreen Crone-Findlay
Measure to be sure you have everything square, and put the top half of your loom back on.
Stand back in amazement at your loomie on stilts! Wowsa!
The best part is that the loom is still miraculously stable and works perfectly.
I find that resting it against the edge of the desk and having the lower edge sitting in my lap is the most comfortable way to weave with the extensions on.
Also, weaving standing up works well.
Having the stand for it would be sublime.
I made a video of the ‘putting it together’ process:

Happy weaving! :D
Noreen

Friday, July 20, 2012

A few notes about the Treadle and hints and tips for the Mirrix

A few notes about the Treadle and hints and tips for the Mirrix

A couple of my friends on Ravelry asked me to show them why I love the treadle for my Mirrix loom so much.
(Apart from the fact that my wonderful husband and family bought it for me for Mother’s Day, which automatically pins a rose!)

copyright Noreen Crone-Findlay
So, I made a video about why the treadle is so great.
Of course, the whole point of having the treadle is to have it open your shed for you without having to reach up to the shedding device to  change sheds by hand.

copyright Noreen Crone-Findlay
It does this beautifully, which allows you to create a lovely uninterrupted rhythm in your weaving.
Your hands are happily, busily doing their thing at the fell line of the weaving.
Also, if you have a wide loom, like the Joni, and short arms like mine…. then your shoulder is going to go ‘boink’.
The treadle is ergonomic heaven for sore shoulders.
I like to work my treadle with both feet, so I have it set up directly in front of me, parallel to the edge of the table.
I have to have bare feet, as I need to feel exactly where my feet are on the treadle and what they are doing.
Shoes make that impossible for me.
While I am weaving, I sit in an office chair that easily goes up and down.
I raise it as I weave up the warp, and lower it again, after I advance the warp.
A few other handy tips and hints that I have found to make weaving more fun and efficient:
  • a magnet on the wing nut is very handy for holding needles and small crochet hooks
  • having a pair of thread snips tied to the warp bar or a lease stick is VERY handy
  • placing the loom on a piece of plywood that is a couple of inches wider than the loom is a great way to deal with a table that is too narrow for the loom
  • lifting the front feet of the loop slightly by placing 1/2 inch/1 cm high blocks under them eases neck and shoulder strain because it tilts the loom back a little more
  • I don’t like marking my looms, so I cut measuring tapes to fit the upper and lower beams and attach them with velcro straps.
  • Velcro straps (AKA velcro cable ties) are one of the best inventions ever! I use them to connect all kinds of things to my looms without damaging the loom.  So handy!  I bought my velcro cable ties from Lee Valley tools (link)
  • If you use velcro cable ties as connectors, be sure to have the fleecy side out, not the loop snaggy side out.
  • I think of my Joni with the treadle attached as a floor loom. She’s so big that I don’t want to be moving her around, especially with the treadle in tow.  So, having her permanently living on her own dedicated table works great, especially since I have plastic containers full of yarn sitting under the table.  Good use of space!  Gotta store that stash! :) 
  • I drilled holes in the ends of a dowel, put split rings into the holes, and velcro strapped the dowel to the loom so I could hang the cartoon over the dowel. It works a fair treat!
There… I think that I have covered all the hints and tips in the video….
and without further ado, here is the video about the wonderfulness of the Mirrix treadle.
I think Claudia is a genius to have come up with it.  :)
Happy Weaving!
:o) Noreen

Back on track

As mentioned previously, I wasn't happy with the colour of the neck area. It was standing out too much, and not quite right. I should have changed it as I wove those rows, but fear wouldn't let me. Hindsight is a great thing!

I started frog stitching it this week. For those who don't know, frog stitch (rippit!) is undoing. Someone told me a method for undoing without taking out all the rows after the section you intend to undo. I removed two rows, and wove the first again with the new colour choice. The difference was instantaneous! It looked better after just the one row!. It's subtle but you can see it nonetheless.


I undid the remaining rows and rewove them all. It was a very good decision to change the colour. It's definitely looking better. Of course I'd still love to hear your opinion on that! I did some more weaving today, and one of the faces is almost complete. I've been looking at it up close all day, so I'll reserve judgement till tomorrow. Sorry about the photo. It's dark so I can't get a great one.


I am seriously considering lining the purse. The plan was to reweave the warps along the top edge, and join the bottom of the panels using the warps. If I go ahead with lining it (I strongly dislike sewing!), I can skip reweaving the warps along the top edge. I'll also have to get thinking about the handle and fringe.

On another note, I have a project for which I want include loom bead weaving as one of the techniques I'll leave the rest to your imagination :)


Happy beading and have a good weekend.


Saturday, July 14, 2012

To frog or not to frog

It's been one of 'those weeks'. The type where life gets in the way. On top of that, my beading mojo did a disappearing act on me! So I was left with no motivation, despite working on something nice and exciting. I normally force myself to work on the project and find it comes back. This time i just couldnt! I managed to pull myself out of the funk on Tuesday. I was all set up and ready to go (it takes about 5 minutes for me to lay out the beads), but children got in the way. By the time I thought about starting, it was too late to get any decent weaving time in! So, I (dishearteningly) spent another 5 minutes putting the beads away. The next day was a work day so any chance of doing something was out the window.

It came to Thursday and I was DETERMINED I would do some looming. I set myself up (5 minutes once again!), then took the children outside for a while. As soon as I got the chance, I made a start! The excitement was starting to build as I'm now coming up to the face.

Now, I have done a little bit of (on-loom) editing while weaving the upper rows of the hand. There was one particular colour used below, which I felt didn't work. So I removed it in the last rows of the hand, and it seems to look ok. I thoughts about editing the neck colour as well, but ran scared. I find the colour stands out too much against the surrounding area. I'm debating whether to undo all those lines and use a softer colour....if it were you, what would you do?!

Getting there

Today, I spent the morning having my hair done. I did some crochet and now my thumb is sore. So I can't (shouldn't) do any looming today. That would just aggravate it. I can wear thumb support but it's difficult to work with it on. I'll just finish my book and prepare for the coming week - the face(s) appearing, WOO!!

The next time, you'll be seeing whether I decided to go reverse and change the neck colour, or left it and moved on! Enjoy the remainder of your weekend and happy reading :)

Friday, July 13, 2012

Cheap and Cheerful alternatives for tapestry bobbins

Tapestry bobbins have a  mystique around them and  they can be expensive.
But, what do you do if you need a lot of tapestry bobbins and have a limited budget?
Well... you improvise.
copyright Noreen Crone-Findlay
First you analyse, then you upcycle!

After all... a tapestry bobbin is a yarn delivery device. 
What does it need to do?
It needs to hold yarn in a way that allows you to pass it through a fairly small shed.
It should have a tip that will allow you to tap your weft yarn into place.
It needs to be able to hang from the tapestry while it's parked.
So.... there are things that will work quite nicely for you as you feed your piggybank, but weave your tapestries in the meantime.
I make my own quirky, but perfect for me tapestry bobbins from upcycled wood: Link to post
copyright Noreen Crone-Findlay
Recently, I noticed that one of my fave bobbins looks a lot like a little spoon...
and of course, that started me thinking...
would a little coffee spoon work as a tapestry bobbin?
It seemed rather outrageous....
copyright Noreen Crone-Findlay
So, I took a little orphaned silver coffee spoon that had been in a box of sandbox toys that I bought for my grandson at a garage sale, and hammered the poor thing flat.
It works BEAUTIFULLY as a tapestry bobbin! 
copyright Noreen Crone-Findlay
This made me think.... hmmm.... metal spoon.... hmmmm.... ~metal bobbins~.... hmmmmmm....
So, what about a 4 inch nail with a bead on the end?  Would that work?
Yup. Wash it well first, and if the tip is snaggy, sand it smooth or file with a nail file.
You could paint it if you want, or coat it with a clear gel just to ensure that it won't discolor your yarn.
Stuff a bit of tissue into the opening of the bead to secure it.
copyright Noreen Crone-Findlay
I learned about using bamboo forks as bobbins on Ravelry.
I like them!
But, I have found that they work much better if you stick a bead on the end.
Squish the tines of the fork into the bead center and you're set to weave.
copyright Noreen Crone-Findlay
I love tatting, and used to carve tatting shuttles.
I've discovered that my Little Bird shuttles work beautifully as tapestry bobbins.  Whodathunkit?  :)
So, be creative and think outside the box when you are contemplating tapestry bobbins.
I mean, really... spoons and forks?
Yes!
If you are willing to experiment, you'll find all kinds of things that will work really well in your weaving!
Here's a video that I made about cheap and cheerful alternatives for tapestry bobbins:

Noreen

Tuesday, July 10, 2012

Sketching Swatching and Sampling are such valuable weaving tools

I am working hard on a new tapestry. It’s inching along, as tapestry does, when you are in focused mode.
BUT… I found myself feeling really stuck when I finished one section, and couldn’t move forward onto the next section.
So, I fell back on my ultimate design tool.
I got out my sketchbooks and aquarelles (watercolor pencils), and did the thing that my drawing master back in my art school days drilled into me: Sketch, sketch, sketch!
copyright Noreen Crone-Findlay
He also drilled into his students that it is essential to carry your sketchbook or notebook with you ABSOLUTELY EVERYWHERE, and to sketch every single day.
AND, even more important: Don’t worry about making ‘good’ sketches.
Just catch thoughts, dreams, words, and other fleeting moments on the paper and let them build a vocabulary for you.
The part of the tapestry that had me flummoxed is a child’s costume.
I didn’t know what I wanted to do with it, until I worked my way through a bunch of really rough, ‘thinking on paper’ sketches.
That took me through the roadblock to the ‘AHA’….
And I knew that I needed to move onto sampling and swatching.
copyright Noreen Crone-Findlay
I set up my 8 inch Lani Mirrix loom with a ‘no warp ends’ warp, using ‘S’ hooks… in the video, I show some pointers about this setup.
As a professional designer, I cannot underestimate the importance of swatches and  sampling.
I am always amazed by knitters and crocheters who skip this foundation aspect of the creative process!
So much is revealed in the swatching and sampling stages of creation.
AND… something else that is a huge bonus- so often, the sampling and swatching will reveal that there is something new to explore!
(Which of course, leads back to the sketching…) !
Even though the feeling stuck part of working on this tapestry really stank while I was in it, I ended up feeling really grateful for being forced to move back to basic problem solving techniques.
Why? Because I am now inspired to explore soumak weaving, which I have not done before.
I am fascinated and intrigued…. there will be more about this!
In the mean time, here’s the video about sketching, sampling and swatching.
And, even though I don’t normally like to show pieces while they are in progress, I did do a little ‘reveal’ of the new tapestry.

Friday, July 6, 2012

Creating a pattern from a photo


I was asked to create a bracelet from a photo of the great Nelson Mandela. I was able to find a very good photo. Although the file size (and quality) isn’t ideal, it will work.

When creating patterns from photos, I tend to use BeadCreator. If it’s in black & white, I may also use BeadTool. My first step is always to convert the photo before doing any editing.


BeadCreator comes with 3 palettes, including the Miyuki delica size 11 (my choice of beads for all looming). It’s advisable to edit the colours so they look as close to real life as possible, but you can also create your own palette(s). I saved the available palette so that all silk delicas are excluded.


Once you’ve chosen your palette, you have to decide what size you want the (entire) pattern to be. This step is always trial and error for me. I enter a size, click Apply, and see how it looks. For this one, I started with a width of 6”, which didn’t give me the detail I needed for the face. 8.5” gives me good detail, and I could go wider on this cuff, so it suited my needs.

Next I remove unwanted columns and/or rows, and reduce the colour count. The original had 156 colours! I cut it down to 35, resulting in this:


It’s not bad but I want the face to be more distinguished from the background. So, in Photoshop, I darkened the background area surrounding the head and shoulders. I also lightened the face, hands and jacket a little. I re-converted, and ended up with this:


The difference between this and the original may not be obvious, but is there nonetheless. For the final conversion, I increased brightness, decreased saturation, and also altered the hue slightly. It’s ok, but perhaps a little too light in the face.


So you can see my photo conversions are a matter of trial and error. I will first convert the original then play with it in Photoshop. What I alter/edit depends on the result in BeadCreator, and also what I think may help. I normally save several versions of the patterns, particularly the full colour pattern. 

I’ll show you how this turns out when I eventually start looming it – hopefully in about two weeks.  Tomorrow I have to try and squeeze in some looming time so I can free it up for the next projects.

Happy beading and enjoy your weekend.