When a weaver and a musician go on holidays, what do they take with them?
Their dogs, of course!
But of course, they never leave home without a guitar
Or, a loom:
The Mini is the most perfect little loom for traveling.
Because she's so portable, I was able to keep working on the Weave Along #8 as we were out and about on our travels.
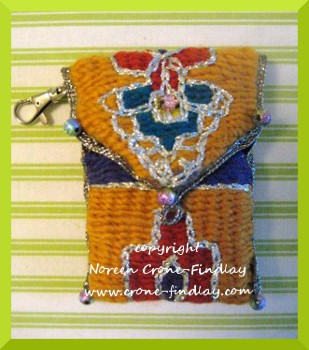
I was weaving away on this pouch while we were away:
So, I took advantage of the gorgeous scenery to photograph the step by step photos of weaving the pouch:
Mini has her own wee suitcase which she snuggles very happily into, along with all the bits and pieces needed for the weaving.
(It began life as a case for a drill that lives in a toolbox, so Jim gave the un-used case to me and I love it for Ms Mini!)
When we are on holidays, I tend to photograph the smaller things, like lichens:
and flowers (ahem... the wind was crazy, so trying to get the flower to sit still was a lost cause)
and small looms on beautiful stony beaches:
and the patterns in tree roots:
and shadows:
and gorgeous driftwood:
and the patterns in nature:
and small dogs having great adventures ... (Yikes! Wolves ATE a dog here? eegads!)
Speaking of wild animals, last year when we went to Jasper (in the Rocky Mountains of Alberta, Canada), we saw 13 bears!
This year, we only saw one:
But we did see one VERY thrilling wild animal- the first time I have ever seen a wild mountain goat, in fact:
It was rainy, windy and cold for the entire time we were there, which made perfect weather for weaving and making music :o)
But then, as far as I am concerned, ANY weather is perfect for weaving and making music :o)
I will be posting the step by step photos for the checkered Soumak Pouch on the 19th of September.
And, of course, the installments of the Soumak Pouch weave along will continue to be posted on Elena's blog, A Word From Elena, every Sunday and Wednesday through out September.
I
hope that you had a lovely summer and that the sun shone upon you, and
music swirled around you and that the yarn was sweet in your hands!
~Noreen~
Showing posts with label weaving. Show all posts
Saturday, September 8, 2012
Friday, August 3, 2012
Mirrix Looms Weave Along #8 Soumak Pouch-ALL the links
Mirrix Loom Weave Along #8 Soumak Pouch- All the links
This blog post is going to be growing, as I will be listing all the links to each of the posts for the Weave Along Soumak Business Card Pouch.Mirrix Loom Weave Along # 8 Soumak Pouch-1- Warp and Weft suggestions and links to order them: LINK
Mirrix Loom Weave Along Soumak Business Card or Cellphone pouch - 2 - Tools, equipment and materials: LINK
Information about the Kit from Mirrix, and the tools and materials for edgings: LINK
Two more pouches and links for Kreinik threads: LINK
Part One: Setting up the Looms: LINK
Part Two: Design Notes: LINK
Part Three: Warping the Looms: LINK
Part Four: Weaving techniques: LINK
Sunday, July 22, 2012
Warping Mirrix Looms with Loom Extenders
Loom extenders for the Mirrix looms are sooooooo neat!You’ll need to make a few adjustments when you are warping the extended loom.
Your best friends when warping the extended loom: Two chairs that don’t have upholstery or cushions:
Place the chairs as far apart as possible:
This leaves a gap that allows you to easily pass the ball of warp around the loom.
You could use 2 small tables if you would prefer, but I like the height of the chairs.
The loom is still happily very stable when it’s extended.
Amazing, isn’t it?
That’s great design for you.
One of the other things that I have found while weaving on the extended loom is that the weaving can pull in on you.
So, to rectify this, take 2 rubber bands, and 2 paperclips.
Open the paperclips, fold the rubber bands around the side bars, and squeeze the shorter end of the paperclip closed.
Hook the larger end of the paperclip through the selvedge, about a half inch below the fell line.
Make sure that the end of the paperclip is towards the back of the loom, as this makes it be less of a snaggle hazard.
Here’s the video:
Happy weaving!
Noreen
Thursday, June 14, 2012
How to wind butterflies and make upcycled wooden tapestry bobbins
Some people love weaving with yarn butterflies.
And some people (like me) don't.
I love wooden tapestry bobbins and I love making each one a unique piece- and I especially like using upcycled wood to make them.
So, for those of you who like yarn butterflies, here's a video tutorial on how to make yarn butterflies:
And, here's how I make my one of a kind tapestry bobbins, which wouldn't suit everyone, but I love them and find them to be a pleasure to use:
Start with a piece of cast off wood. In this case, a wooden plaque (don't use chipboard or mdf ! This needs to be hardwood)
Flip it over, and draw in the rough lines for the first cuts:
next, saw them into rough shape:
Working on getting more definition and shaping:
All the wooden offcuts are going to be burned in the wood burning stove in the studio in the winter- nothing's wasted!
When the rough saw shaping is done:
I move over to the belt sander:
and I do a whole bunch of sanding (very carefully)
Did I mention that this is a really slow, meditative process? Yup.
Go slowly... and pay attention....
Then, it's off to work with a bunch of different small sanding drums:
and files:
And more sanding:
and then, I draw faces on each one, and get out my wood burning tool and draw and burn faces and the year on each one:
Here's a closer look:
I just listen to what each bobbin wants, and then I draw on their faces. Some of them crack me up.
Like the 'Get to the Point' guy... 3rd from the left.... I know, I am easily amused....
And, here they are, all wrapped up and ready to weave!
I hope that the photos will all open for you!
So, happy butterflies, and happy bobbin-ing!
Happy weaving! :)
And some people (like me) don't.
I love wooden tapestry bobbins and I love making each one a unique piece- and I especially like using upcycled wood to make them.
So, for those of you who like yarn butterflies, here's a video tutorial on how to make yarn butterflies:
And, here's how I make my one of a kind tapestry bobbins, which wouldn't suit everyone, but I love them and find them to be a pleasure to use:
Start with a piece of cast off wood. In this case, a wooden plaque (don't use chipboard or mdf ! This needs to be hardwood)
Flip it over, and draw in the rough lines for the first cuts:
next, saw them into rough shape:
Working on getting more definition and shaping:
All the wooden offcuts are going to be burned in the wood burning stove in the studio in the winter- nothing's wasted!
When the rough saw shaping is done:
I move over to the belt sander:
and I do a whole bunch of sanding (very carefully)
Did I mention that this is a really slow, meditative process? Yup.
Go slowly... and pay attention....
Then, it's off to work with a bunch of different small sanding drums:
and files:
And more sanding:
and then, I draw faces on each one, and get out my wood burning tool and draw and burn faces and the year on each one:
Here's a closer look:
I just listen to what each bobbin wants, and then I draw on their faces. Some of them crack me up.
Like the 'Get to the Point' guy... 3rd from the left.... I know, I am easily amused....
And, here they are, all wrapped up and ready to weave!
I hope that the photos will all open for you!
So, happy butterflies, and happy bobbin-ing!
Happy weaving! :)
Sunday, June 10, 2012
Not quite conquered but almost there!
The thing I was fearing the most is over...at least partly! A a participant in the Social market for a Mirrix, we have to post a YouTube video every two weeks. I had NEVER posted a video, let alone a recording of myself! But yesterday I decided to grab the bull by the horns and go for it. I was worried about not making it long enough (i.e. more than 2 minutes) but it actually turned out longer than I had anticipated - close to 11! I cut out a little to shorten it - according to YouTube it was going to take at least two hours to upload!
Anyway here is the result.
Yes that's really the same person speaking in both sections. My voice seems to have had a mind of its' own last night :) Sorry about the quality. As said this is my first time recording a video. Hopefully by the end I will be better and more confident. But otherwise I hope the content is of interest. If there is something you would like to see, please let me know and I will try to oblige.
For now I have to head to bed, tomorrow is work. I also need to decide what project to get onto the loom after I'm done weaving this sample. I've still got the shedding device and yarn setup on there. I think I may try out some patterning in weaving the it it off and. Just keep as something to look at. There is a particular project I want to really make a start on, but need to buy the beads for it - about 35-40 colours in total I think. I have a little of some of them but they're being used on other loomings. I may start buying slowly to replenish stock then I can start. It's quite a...large project but is a very exciting one. Hopefully I can begin on it soon.
I bid you a good night and good Monday!
Anyway here is the result.
Yes that's really the same person speaking in both sections. My voice seems to have had a mind of its' own last night :) Sorry about the quality. As said this is my first time recording a video. Hopefully by the end I will be better and more confident. But otherwise I hope the content is of interest. If there is something you would like to see, please let me know and I will try to oblige.
For now I have to head to bed, tomorrow is work. I also need to decide what project to get onto the loom after I'm done weaving this sample. I've still got the shedding device and yarn setup on there. I think I may try out some patterning in weaving the it it off and. Just keep as something to look at. There is a particular project I want to really make a start on, but need to buy the beads for it - about 35-40 colours in total I think. I have a little of some of them but they're being used on other loomings. I may start buying slowly to replenish stock then I can start. It's quite a...large project but is a very exciting one. Hopefully I can begin on it soon.
I bid you a good night and good Monday!
Saturday, June 9, 2012
Those weft ends
In tatting, it is advised you hide the thread ends as you work, rather than wait till the end. In looming, the same can be applied. It doesn't necessarily make it faster, but there is something laborious about weaving in those weft ends you've decided to leave till last!
Now, I always tell myself this time I'll weave them in as I go along. Problem is I never follow through! I think with the next bracelet I will do just that. It's only a few mins here and there, so makes no difference doing it during rather than after the looming.
On that note, I had to weave in the weft ends of the bracelet that was on the loom. I settled on a simple brick stitch edging so that the pattern stays centre of attention. It's odd how colours can really make a pattern. I did this previously in black and white. I think I prefer this colour scheme by a mile!
There was a bit of 'pull & pray'. But not too many as I split some warps. Nonetheless at least i tried it. I think will definitely use that method at least once in future. Fireline may be a better thread to consider for warps in that case.
Today (read tonight), I managed to try the shedding device again, with just thread this time round. I was advised to try it with thread and the occasional line of beads. So far I've only used thread - DMC Perle. It's nice and simple, quite relaxing actually :) You just have to remember to have the ends at the back of the work, and to change the shed after each pass through.
I had to face my fear and do a video. It turned out to be about 10 minutes long, eek!! I'm hoping to upload it to YouTube tomorrow. Hopefully there's something watchable in there lol!
Thanks for reading and enjoy the rest of your day. I'm off to bed to dream about looms - I seem to do that nowadays! :)
Now, I always tell myself this time I'll weave them in as I go along. Problem is I never follow through! I think with the next bracelet I will do just that. It's only a few mins here and there, so makes no difference doing it during rather than after the looming.
On that note, I had to weave in the weft ends of the bracelet that was on the loom. I settled on a simple brick stitch edging so that the pattern stays centre of attention. It's odd how colours can really make a pattern. I did this previously in black and white. I think I prefer this colour scheme by a mile!
There was a bit of 'pull & pray'. But not too many as I split some warps. Nonetheless at least i tried it. I think will definitely use that method at least once in future. Fireline may be a better thread to consider for warps in that case.
Today (read tonight), I managed to try the shedding device again, with just thread this time round. I was advised to try it with thread and the occasional line of beads. So far I've only used thread - DMC Perle. It's nice and simple, quite relaxing actually :) You just have to remember to have the ends at the back of the work, and to change the shed after each pass through.
I had to face my fear and do a video. It turned out to be about 10 minutes long, eek!! I'm hoping to upload it to YouTube tomorrow. Hopefully there's something watchable in there lol!
Thanks for reading and enjoy the rest of your day. I'm off to bed to dream about looms - I seem to do that nowadays! :)
Subscribe to:
Posts (Atom)