Showing posts with label Noreen Crone-Findlay. Show all posts

Sunday, August 19, 2012

Oooh Claudia made gorgeous kits for the Soumak Pouches

Oooh, Claudia has made gorgeous kits for the Soumak Pouches!


Oh my word!
Claudia has outdone herself in making the kits for the Soumak pouches for the Weave Along in September:
copyright Noreen Crone-Findlay
Aren't the  colors and textures gorgeous?
I just went and picked up the text from this page: LINK
If you're a weave-along 8 participant get $10.oo off this kit with discount code:   weavealong8
This package goes with our Weave-Along 8 hosted by Noreen Crone-Findlay.

Learn more about the weave-along and sign-up here today.
Kit Includes:
-30 yards of 10 each of ten colors of  wool/mohair yarn
-12 x 6 piece of silk for lining
-A semi precious stone for a clasp
-100 gram tube of Navajo Wool Warp
*Please note, this kit does not come with fiber for the edging or a kumihimo kit to make one.
The kit can be purchased separately.
You will have 4 options for making the edging cord for the pouches: 
1- A beaded peyote stitch tubular cord.  If you want to make your cord with beads, be sure to add beads to your shopping list.  Either #8 or #11 work fine, depending on what your favorite size is. I used the #11.
You can order them from Claudia when you order the kumihimo kit and the pouch kit. 
By the way, you will be able to weave more than one pouch from the kit.
OR:
2- A kumihimo cord. You can order it from the link above.
OR:
3- A spool knitted cord.  LINK for the ordering information.
OR:
4- A twisted cord. I'll be showing you how to make a twisted cord with a spool and a crochet hook.
I am rubbing my hands together in delight, as I am having a wonderful time working on a ton of videos to make the Weave Along really fun and super user friendly.
There is a mountain of information, so I am breaking it all down into bites that make sense and are easy to refer to when questions come up.

Happy Weaving!
Noreen


Tuesday, August 7, 2012

Mirrix Loom Weave Along Soumak Pouch- 2- Looms, tools, equipment

Mirrix Loom Weave Along # 8 -Soumak Pouch- 2- Looms, tools, equipment


This is the second 'Prelude Post' for the Mirrix Loom Weave Along for the Soumak Pouch.
The pouches are perfect for both business cards:
copyright Noreen Crone-Findlay
or for cellphones:
My cellphone is one of the smaller, lower tech ones  [4inches tall, 2 inches wide, 5/8 inch thick] if yours is larger, then you will want to upsize your pouch, if your pouch is going to be a cellphone pouch.
copyright Noreen Crone-Findlay
Alright... now onto the gathering up of tools and equipment:
First of all, you need a loom:
copyright Noreen Crone-Findlay
Most of the photos and videos for the weave along will feature my 8 inch Lani Mirrix loom. (Although I have ordered a Mini and a Little Guy, so hopefully, they will arrive soon, so I can use them in the photos and videos, too.)
The pouch can also be woven on any of the larger Mirrix looms as well- if you are using one of the smaller Mirrix looms, then warp up one pouch at a time. If you are using one of the larger looms, then you can warp and weave 2 pouches at the same time.
Even if you don't have a Mirrix loom, please feel welcome to join in the Weave Along.
As long as you have a loom that you can get good tight tension on it, then you will be able to weave the pouches.
copyright Noreen Crone-Findlay
You will also need: A steam iron, a pressing cloth, a good source of light, pencil crayons or watercolors or some other way of coloring your preliminary pattern colorways, 2 clothespins, scissors, needle and thread for finishing, snap fastener and a swivel clip, you'll also need paper for tracing out your patterns and trying out different color schemes.
copyright Noreen Crone-Findlay
Knitting needles and crochet hooks are very helpful, and  a loop turning tool is  handy (I bought mine at my local fabric store),  a piece of cardboard that is 10 inches tall by 3 inches wide (25 cm tall by 7.5 cm wide),  a weaving stick, small paper clamps, a fork or beater, a hole punch, at least a yard of firm yarn or cord, clear tape (packing tape works well); a black fine tip permanent marker
copyright Noreen Crone-Findlay
You'll need rods for the top and lower edge of the weaving: 6 inch (15 cm) tent pegs or 6 inch (15 cm) lengths of steel or brass rods 1/8 inch in diameter (I bought a 36 inch long one at the hardware store and cut it to 6 inch lengths with a hacksaw);  velcro straps (I bought mine from Lee Valley:  Link'S' HOOKS: 25  "S" hooks, either 7/8 inch or 1 inch- opened or closed :[ I had a huge 'AHA' when I bought closed 'S' hooks.... having one end closed is just GREAT... so if you buy closed 'S' hooks, open one end with pliers.  If you buy open 'S' hooks, squeeze one of the ends closed. Having the closed end keeps the 'S' hooks on the rod.  :) ] ; 1/4 inch Washers: 54 in total; 1 or 2 pairs of pliers for adjusting the 'S' hooks; ruler and tape measure.
copyright Noreen Crone-Findlay
Some of these things have shown up in other photos, so I won't list them again, but the other things are:  A small bowl for holding pins, needles, clamps etc;  a bag or box to store and transport the project (that's Tottie Tomato's knitting bag); chopsticks are very handy for several things  besides your Pad Thai :)
copyright Noreen Crone-Findlay
You will need at least 5 or 6 blunt tapestry or craft or darning needles. It's handy to have a needlebook or tin, or cardboard tube or eyeglass case to store them in.
copyright Noreen Crone-Findlay
To line the pouch: Fabric (I upcycled one of my son's abandoned t shirts for the lining of the first 4 bags), scissors, pins, needle and thread, snap fastener: I used the 15 mm size.
copyright Noreen Crone-Findlay
To make the edging cord: A kumihimo kit (the cd is a stand in as I haven't received mine yet) available from Mirrix: LINK
OR a spool knitter: Lion Brand: LINK
or Harrisville:  LINK

CHECKLIST at a glance:

- Loom

- steam iron
- pressing cloth
-a good source of light
- pencil crayons or watercolors or some other way of coloring your preliminary pattern colorways
- paper for tracing out your patterns and trying out different color schemes
- 2 clothespins
-scissors
-needle and thread for finishing
-snap fastener 15 mm size

-swivel snap hook (optional)
-knitting needles & crochet hooks
-Optional:  a loop turning tool is  handy
-a piece of cardboard that is 10 inches tall by 3 inches wide (25 cm tall by 7.5 cm wide)
-  a weaving stick
- small paper clamps
-a fork or beater
-a hole punch
-at least a yard of firm yarn or cord
-clear tape (packing tape works well)
-a black fine tip permanent marker
-Rods for the top and lower edge of the weaving: 6 inch (15 cm) tent pegs or 6 inch (15 cm) lengths of steel or brass rods 1/8 inch in diameter
-velcro straps   Link
-'S' HOOKS: 25  "S" hooks, either 7/8 inch or 1 inch- opened or closed 
1/4 inch Washers: 54 in total
-1 or 2 pairs of pliers for adjusting the 'S' hooks
-ruler and tape measure
- small bowl for holding pins, needles, clamps etc
- a bag or box to store and transport the project
- chopstick (optional)

- At least 5 or 6 blunt tapestry or craft or darning needles and a needlebook or tin, or cardboard tube or eyeglass case to store them in.
-Lining fabric
- Straight pins

-kumihimo kit  OR a spool knitter
-any other embellishments, beads, buttons, charms or found objects that you wish to use.
Happy Weaving!
:) Noreen

Wednesday, July 25, 2012

Tips for quick and easy heddling on Mirrix looms

Tips for quick and easy heddling on Mirrix looms

I love how easy it is to warp the Mirrix looms.
I’ve found that there are a few things that can make the process of attaching the heddles go quick as a wink.
Efficient is good!  :)
copyright Noreen Crone-Findlay
The first thing that I do, after I release the warping bar from the blocks and turn them around, is to slide a piece of cardboard or masonite between the layers of warp strands at the front of the loom and the back of the loom.
It sits there, in the middle, blocking the distracting view of those warp strands at the back of the loom. :)
Then, I use a shed stick that is at least as long as the width of the loom to pick up every other warp strand.
copyright Noreen Crone-Findlay
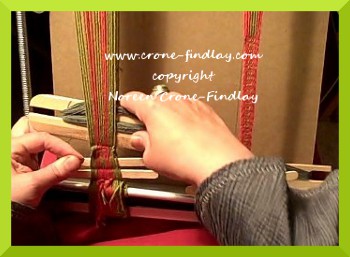
Then, I flip the shed stick on it’s side, with each end being supported by the shedding device blocks.
I now have 2 layers of warp strands because of this shed being open.
So, to keep the back warp strands out of view, I slide a ruler or strip of cardboard into the open shed.
Bliss! Now, I just have one set of warp strands ready for the heddles- Yay!
This makes things sooooo much easier!
I like the center brass knob of the shed changer to be as close to the exact center of the warp strands.
So, I count how many strands I need to attach to the rod, and divide that in 1/2.
I place 1/2 the heddles on 2 of my fingers, and 1/2 on the other 2 fingers.
copyright Noreen Crone-Findlay
I loosen the heddle rod and slide it along so it’s about 2 inches/5 cm from the edge of the warp strands.
copyright Noreen Crone-Findlay
Then, I reach behind the warp strand with a crochet hook, pluck a heddle off my fingers, and pull it behind the warp strand.
I catch both ends of the heddle loop and pop them onto the heddle bar. Slide the bar along as you go.
When I run out of the the first clump of heddles, I should be half way along the warp strands.
I work across , picking up all the strands, and attaching them to the heddle bar, then tighten up the little nut that holds the heddle bar in place.
Remove the shed stick and ruler, then rotate the heddle bar, sliding the heddles down the warp strands.
Turn the shed opener enough so the heddles open your first shed.
copyright Noreen Crone-Findlay
Use the shed stick to pick up the warp strands that are between the warp strands that you have just heddled.
Turn it on it’s side, insert the ruler, and repeat the process.
Check to make sure that all the heddles are securely attached to the heddle rods.
When I was making the video, one little bounder escaped, which was actually a good thing.
This allowed me to show how to capture the escapee heddle and tie it back in place.

copyright Noreen Crone-Findlay
Remove the shed stick and ruler and check the sheds, then attach the handle or treadle and Voila!
You’re ready to weave!
Here’s the video:

Happy Weaving! :D

Friday, July 13, 2012

Cheap and Cheerful alternatives for tapestry bobbins

Tapestry bobbins have a  mystique around them and  they can be expensive.
But, what do you do if you need a lot of tapestry bobbins and have a limited budget?
Well... you improvise.
copyright Noreen Crone-Findlay
First you analyse, then you upcycle!

After all... a tapestry bobbin is a yarn delivery device. 
What does it need to do?
It needs to hold yarn in a way that allows you to pass it through a fairly small shed.
It should have a tip that will allow you to tap your weft yarn into place.
It needs to be able to hang from the tapestry while it's parked.
So.... there are things that will work quite nicely for you as you feed your piggybank, but weave your tapestries in the meantime.
I make my own quirky, but perfect for me tapestry bobbins from upcycled wood: Link to post
copyright Noreen Crone-Findlay
Recently, I noticed that one of my fave bobbins looks a lot like a little spoon...
and of course, that started me thinking...
would a little coffee spoon work as a tapestry bobbin?
It seemed rather outrageous....
copyright Noreen Crone-Findlay
So, I took a little orphaned silver coffee spoon that had been in a box of sandbox toys that I bought for my grandson at a garage sale, and hammered the poor thing flat.
It works BEAUTIFULLY as a tapestry bobbin! 
copyright Noreen Crone-Findlay
This made me think.... hmmm.... metal spoon.... hmmmm.... ~metal bobbins~.... hmmmmmm....
So, what about a 4 inch nail with a bead on the end?  Would that work?
Yup. Wash it well first, and if the tip is snaggy, sand it smooth or file with a nail file.
You could paint it if you want, or coat it with a clear gel just to ensure that it won't discolor your yarn.
Stuff a bit of tissue into the opening of the bead to secure it.
copyright Noreen Crone-Findlay
I learned about using bamboo forks as bobbins on Ravelry.
I like them!
But, I have found that they work much better if you stick a bead on the end.
Squish the tines of the fork into the bead center and you're set to weave.
copyright Noreen Crone-Findlay
I love tatting, and used to carve tatting shuttles.
I've discovered that my Little Bird shuttles work beautifully as tapestry bobbins.  Whodathunkit?  :)
So, be creative and think outside the box when you are contemplating tapestry bobbins.
I mean, really... spoons and forks?
Yes!
If you are willing to experiment, you'll find all kinds of things that will work really well in your weaving!
Here's a video that I made about cheap and cheerful alternatives for tapestry bobbins:

Noreen

Saturday, June 30, 2012

How to weave inkle bands on Mirrix Looms Part Four

This is the fourth video tutorial about how to weave inkle bands on Mirrix looms.
copyright Noreen Crone-Findlay
A dear friend asked me: "Why are you spending all this time figuring out how to weave inkle bands on the Mirrix loom? You have inkle looms! "
Yes, I do... an open sided one, a closed side one that my husband built me from upcycled pallet wood, and a mini.
And, I love them.... but, I find that the open side and mini inkle looms both kind of flop when I have one end on the desk edge and one end in my lap. This is the way that I like to weave with inkle looms, and I find the wobble/flop rather frustrating.
I really like how stable the Mirrix is when I have the lower edge in my lap and the upper edge against a workbench, table or desk.
Also, I love the precision of the tensioning on the Mirrix... those thumbscrews are sweet!
And, I also love the shedding device.......... soooooooooo smooth.  :D
Besides, the Mirrix takes up sooooooooooooo little room to store it- inkle looms do take up a chunk of space in the studio!
That's four good reasons that have made this rather challenging learning curve worthy of the time I have invested.
Here's the video for the finishing process of weaving inkle bands on the Mirrix loom:

When you have woven your bands to the point that the warping rod is sitting on top of the loom, you will need to remove the spring:
copyright Noreen Crone-Findlay
Loosen the tension up  a lot....
copyright Noreen Crone-Findlay
Lift the spring rod out of the spring.
Release the ends of the springs from the knobs.
Gently, ease the spring out of the warp strands by spreading the warp strands out slightly and pushing on the spring to disengage it.
Continue weaving until the shuttle almost can't make it through the shed.
copyright Noreen Crone-Findlay
Weave one row.
Keep the shuttle in the shed, and place a darning or tapestry needle in the shed with the point pointing in the direction that the shuttle exits the shed.
Weave the next row, and repeat with a second darning needle.
The needles now point in opposite directions.
Weave one more row.
Cut the weft strand, and thread it into the first needle.
Pull it through, and remove the needle.
Thread the weft strand into the remaining needle and pull it through.
La de dah! you have finished your inkle band!
Wheee! :D
I always weave the tail end in a little bit more before I trim it off.
Loosen the tension wayyyyyyyyyyyyyyyyyy off, and slide the warping rod out of the loops.
Trim the ends, and pull them through the heddles.
Congratulations, you've woven some scrumptious new inkle bands! :)
Happy Weaving!
~Noreen

How to weave inkle bands Part Three

Part 3 of the video tutorial series on how to weave inkle bands on Mirrix looms is about the weaving process:
copyright Noreen Crone-Findlay
Something that I learned as I trundled up my ever so steep learning curve with figuring out how to weave inkle bands on the Mirrix loom:
I started out by weaving one row on one band, putting it's shuttle down, then picking up the second shuttle and weaving one row on the other band.
Sounds slow and clunky, doesn't it? Well, you're right.
The most efficient way to weave 2 bands at once is to weave as far as you can on one band, then set that shuttle aside, and weave away on the second band.
Oh... speaking of shuttles, here's the tracing of my most favorite inkle shuttle:
copyright Noreen Crone-Findlay
I designed this one several years ago, and I love it. Works like a charm.
Here's the video that shows the weaving process:

copyright Noreen Crone-Findlay
When you need to advance the warp, loosen the tension quite a lot.
Support the spring as you gently ooze the warp rod around and up the back of the loom.
Pat the warp strands back into the channel, and tighten up the tension again.
Remember, you do not need to have the tension as tight as when you are weaving a tapestry or beading.
You'll find the perfect tension that suits you best.
Keep on weaving until the warp rod is sitting on top of the loom, and then check into the 4 th video in the series:
How to finish the bands.
~Noreen

How to weave inkle bands on Mirrix looms Part Two

This is the second stage of the video tutorials that I made on how to weave inkle bands on the Mirrix loom.
copyright Noreen Crone-Findlay
There are two bands on the loom, because in this video, I am working on the 16 inch loom.
When you work on the 8 inch loom, it's okay to just weave one band at a time, as the warping bar doesn't flop around.
But, on the 16 inch loom, you do need to either warp up 2 bands, or secure the other end of the warping bar with a cord so it will stay perfectly horizontal.
I tried weaving 3 bands at once on the 16 inch loom, and didn't like it, as the center knobs on the shedding device got in the way.
Two bands are just great though.
AND.... if you want to weave longer bands, and have either a 12 inch or 16 inch Mirrix loom then the loom extenders will be your friend :)
I use a crochet hook and a weaving stick to make the heddling process go quick like a bunny.
Here's the video tutorial:

Start by placing a piece of cardboard between the layers at the front of the loom and the back so you can't see the warp strands at the back of the loom.
copyright Noreen Crone-Findlay
Place the shed changing device into the brackets.  Unscrew the little knob that holds the heddle rod in place.
Pull the heddle rod back so it's about half way along the warp strands.
copyright Noreen Crone-Findlay
Place the heddles onto the fingers of your non dominant hand.
copyright Noreen Crone-Findlay
Look down at the warp strands that are at the lower edge of the front of the loom.
There's a gap between the strands that have gone in front of the warping bar and behind it.
Slip your fingers into the gap and scoot them up to the shedding device.
Slide a shed stick into the gap.
Voila! (which is how 'walla' is really spelled :)  )
You have shed one ready to heddle!
copyright Noreen Crone-Findlay
Now, slip the crochet hook behind the first warp strand, pluck a heddle off your fingers, and pull it forward.
Catch the other end of the heddle loop and place both loops on the heddle rod.
Go slowly, and be sure that both ends of the heddle loop stay politely on the heddle rod.
copyright Noreen Crone-Findlay
When you have all of the warp strands heddled, slide the heddle bar into position in the knobs, and tighten the lock nut.
Repeat the heddling process on the second set of warp strands for your other band.
copyright Noreen Crone-Findlay
Push the first set of heddles down as you rotate the shedding device.
copyright Noreen Crone-Findlay
Leave the shed stick in place, and use the crochet hook to pick up the warp strands for the other shed.
Take the warp strand from the back to the right of the one in front, and onto the hook,
take the hook over the front strand, and pick up the next strand and carry on across.
copyright Noreen Crone-Findlay
Slide the weaving stick out of the first shed, and slip it along the crochet hook to transfer the warp strands from the crochet hook to the weaving stick.
copyright Noreen Crone-Findlay
Turn the weaving stick on it's side, and then pick up the warp strands one at a time and capture them with the heddles just as you did for the first set of warp strands.
copyright Noreen Crone-Findlay
Repeat this process for the second band.
Check your heddles carefully to make sure that they are opening the sheds properly.
Ahhhhh! a warped loom is a thing of beauty!
copyright Noreen Crone-Findlay
Attach the handle to the shedding device and adjust the tension by turning the thumbscrews.
Open the first shed, and insert a craft stick, then open the second shed and insert another craft stick.
Squish the warp strands together to establish the width of your band.
copyright Noreen Crone-Findlay
Weave one row, leaving a 6 inch/15 cm tail.
Change sheds, and weave the next row.
Pull up firmly on the tail end and weave it through the same shed.
Repeat several times until the tail end is woven in, and the band is established.
Next video: The fun part! Wheeeeeee.... weaving...... 
~Noreen

How to weave inkle bands on Mirrix looms Part One

I love weaving inkle (warp face) bands.
I use  in dollmaking:
copyright Noreen Crone-Findlay
Link to purchase pattern for Inkle dolls: Inkle Dolls
And, they are wonderful for trimming handwoven clothing:
copyright Noreen Crone-Findlay
Link to post that shows how to shape inkle bands to make a yoke or other shaped pieces of garments: Warp pulling
Over the years,  I have also made hat bands, book marks, all kinds of jewelry, key fobs,  vests, bags, bag handles, the garters for the men's kilt hose for my son's wedding, shawls, freeform pieces that combine inkle weaving, knitting, embroidery, spool knitting and crochet, as well as rugs.
Yep. I love inkle weaving.
So, as I have been exploring the possibilities of weaving with my Mirrix looms, I had to give inkle weaving a try.
I found that it was quite challenging at first. But, I don't give up easily :)
I ended up spending waaaaaaaaaaaaaaay more hours than I should have, experimenting and obsessing over making inkle bands on the Mirrix.
Well... I finally succeeded.
Since it was so challenging, I figured that I should share what I have learned, so that other intrepid inkle weavers can leap right in, without all the trial,  error and frogging that I went through!
There are definitely tricks to weaving inkle bands on the Mirrix looms, and I have made 4 videos to share those tricks.
Here's part one of the video:

Here is the draft for the bands that I wove in the videos:
copyright Noreen Crone-Findlay
To read the draft: Each square represents one warp strand.
You can check your warping by looking at each shed to see that it has the same number of strands, in the order that they appear in the line.
You will be  putting a total of 8 green strands on, followed by 4 orange strands, 3 sets of  (1 orange, 1 green) for a total of 6 strands, then 4 orange strands and ending with 8 green strands.
At the top and bottom of the loom, you'll see the full count of warp strands.
At the warping bar, the 2 sheds will be separated into their correct (we hope!) configuration for each shed.
The chart will give you bands like this:
copyright Noreen Crone-Findlay
The upper band is the band on the right hand side of the loom in videos 2 - 4.
I only used the center of the draft for it, without the green border strands.
The yarn is Lion Brand Cotton.
copyright Noreen Crone-Findlay
Setting up the loom for inkle bands is different than normal warping.
You need to have the warping bar at the front of the loom.
copyright Noreen Crone-Findlay
Tie the green yarn onto the warping bar and take it up and around the loom, just the same as if the warping bar was in the back.
copyright Noreen Crone-Findlay
You will need to cut the warp strand of color 1 to tie on color 2 at the warping bar, for EVERY color change.
WHAT?!?!?!
Yes. really.
It sounds insane, but this is the biggest key to making the whole inkle thing work on the Mirrix loom.
Trust me. You ~can~ twist your yarns around each other, and are welcome to, I'm sure, if that would make you happy....
BUT.... the quickest, easiest way to have problem free warping for inkle is to cut those little darlin's and tie the knots between the colors.
copyright Noreen Crone-Findlay
Yay! Warped!  Insert the spring rod into the spring to keep the warp strands locked into their notches.
This is sooooooooooo important!  (yep... voice of 'oops' experience here :( )
And in Part 2.... it's on to the heddles.
I have a nifty, super friendly way of using a crochet hook and weaving stick to make the heddling process go like a breeze.
That's coming up next.... so stay tuned! :)
Happy Weaving,
Noreen