Showing posts with label soumak. Show all posts

Saturday, August 25, 2012

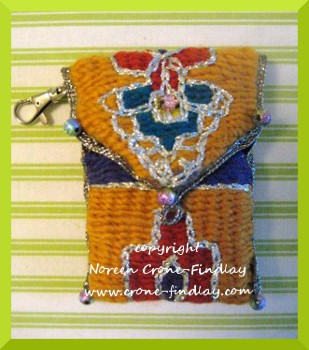
Two more pouches for the Soumak Pouch Weave Along

I've been shooting videos for the weave along  that begins on September 2nd.
As I was shooting, I was weaving along on a couple of pouches.

Here they are:

A Stripey one, with some beads and other embellishments:
copyright Noreen Crone-Findlay
and the back:
copyright Noreen Crone-Findlay
I wove it with Lion Brand Bonbon yarn- cotton for the body of the pouch and metallic for the embellishment.

The size 8 beads along the sides are from Mirrix and the bone beads at the lower edge were in my stash.


The medallion on the back of the pouch is one that I snitched from a box of stuff that my daughter in law was going to give away. 
(She gave it away, but to ~me~ instead of giving it to 'anonymous' -  I can be shameless when it comes to pretty goodies! )

My daughter in law grinned at me when she saw the finished pouch, and said:
 'This one is yours, isn't it, Mum?'
'Yes! but how did you guess?'
She just laughed.
  I guess it's because I adore these colors and use them all the time!
...
I was concerned about this pouch:
copyright  Noreen Crone-Findlay
Why?  Well, because both my daughter and my daughter in law declared that they loved it and would love to have SantaMamma leave it in their Christmas stocking.

I didn't want to make two pouches that were exactly alike, so I had to have a big old think about it.

And, I came up with the perfect answer!!!!!
copyright Noreen Crone-Findlay
TADAH!!!!   I wove it up in the same colorway, but using the drop dead luscious wool yarn from the Mirrix kit   [LINK to purchase]
(and, please note,: I don't profit by raving about the delicious and gorgeous yarns I am using for these pouches, but I am just tickled pink with them, and VERY happy to say: WHEEEEEEEEEEE about them and to say: Yup... thumbs up, order and love 'em, too)   :o)

Here's the back of the woolie pouch:

www.kreinik.com supplied me with the gorgeous embroidery thread and edging cord for this pouch.
Here are the links for them:
The edging is 3/8 " trim:  # 170 Natural Pewter    
http://www.kreinik.com/kshop/product.php?productid=17023&cat=0&page=1

The embroidery thread is: Ombre: http://www.kreinik.com/kshop/product.php?productid=622&cat=0&page=1  1000 - Solid Silver
I love the combination of the soft loftiness of the wool with the sparkle of the metallic embroidery floss. The embroidery thread is soft and lovely to work with. Some metallics can be barky and sharky. This is soft and nooshy.

!AND! 

Happy dance!
and   ~whew~

My daughter in law (who happens to be an incredibly gifted and talented handspinner, so she is naturally inclined to be more drawn to wool),  likes the woolie pouch -

HURRAH! SantaMamma is so relieved! 

My girls will have their lovely pouches in their Christmas stockings, and they are 'sister pouches'.... similar, but each unique!  
Alright... time for me to get back to editing video.....  :o)
~Noreen~

Sunday, August 19, 2012

Oooh Claudia made gorgeous kits for the Soumak Pouches

Oooh, Claudia has made gorgeous kits for the Soumak Pouches!


Oh my word!
Claudia has outdone herself in making the kits for the Soumak pouches for the Weave Along in September:
copyright Noreen Crone-Findlay
Aren't the  colors and textures gorgeous?
I just went and picked up the text from this page: LINK
If you're a weave-along 8 participant get $10.oo off this kit with discount code:   weavealong8
This package goes with our Weave-Along 8 hosted by Noreen Crone-Findlay.

Learn more about the weave-along and sign-up here today.
Kit Includes:
-30 yards of 10 each of ten colors of  wool/mohair yarn
-12 x 6 piece of silk for lining
-A semi precious stone for a clasp
-100 gram tube of Navajo Wool Warp
*Please note, this kit does not come with fiber for the edging or a kumihimo kit to make one.
The kit can be purchased separately.
You will have 4 options for making the edging cord for the pouches: 
1- A beaded peyote stitch tubular cord.  If you want to make your cord with beads, be sure to add beads to your shopping list.  Either #8 or #11 work fine, depending on what your favorite size is. I used the #11.
You can order them from Claudia when you order the kumihimo kit and the pouch kit. 
By the way, you will be able to weave more than one pouch from the kit.
OR:
2- A kumihimo cord. You can order it from the link above.
OR:
3- A spool knitted cord.  LINK for the ordering information.
OR:
4- A twisted cord. I'll be showing you how to make a twisted cord with a spool and a crochet hook.
I am rubbing my hands together in delight, as I am having a wonderful time working on a ton of videos to make the Weave Along really fun and super user friendly.
There is a mountain of information, so I am breaking it all down into bites that make sense and are easy to refer to when questions come up.

Happy Weaving!
Noreen


Tuesday, July 10, 2012

Sketching Swatching and Sampling are such valuable weaving tools

I am working hard on a new tapestry. It’s inching along, as tapestry does, when you are in focused mode.
BUT… I found myself feeling really stuck when I finished one section, and couldn’t move forward onto the next section.
So, I fell back on my ultimate design tool.
I got out my sketchbooks and aquarelles (watercolor pencils), and did the thing that my drawing master back in my art school days drilled into me: Sketch, sketch, sketch!
copyright Noreen Crone-Findlay
He also drilled into his students that it is essential to carry your sketchbook or notebook with you ABSOLUTELY EVERYWHERE, and to sketch every single day.
AND, even more important: Don’t worry about making ‘good’ sketches.
Just catch thoughts, dreams, words, and other fleeting moments on the paper and let them build a vocabulary for you.
The part of the tapestry that had me flummoxed is a child’s costume.
I didn’t know what I wanted to do with it, until I worked my way through a bunch of really rough, ‘thinking on paper’ sketches.
That took me through the roadblock to the ‘AHA’….
And I knew that I needed to move onto sampling and swatching.
copyright Noreen Crone-Findlay
I set up my 8 inch Lani Mirrix loom with a ‘no warp ends’ warp, using ‘S’ hooks… in the video, I show some pointers about this setup.
As a professional designer, I cannot underestimate the importance of swatches and  sampling.
I am always amazed by knitters and crocheters who skip this foundation aspect of the creative process!
So much is revealed in the swatching and sampling stages of creation.
AND… something else that is a huge bonus- so often, the sampling and swatching will reveal that there is something new to explore!
(Which of course, leads back to the sketching…) !
Even though the feeling stuck part of working on this tapestry really stank while I was in it, I ended up feeling really grateful for being forced to move back to basic problem solving techniques.
Why? Because I am now inspired to explore soumak weaving, which I have not done before.
I am fascinated and intrigued…. there will be more about this!
In the mean time, here’s the video about sketching, sampling and swatching.
And, even though I don’t normally like to show pieces while they are in progress, I did do a little ‘reveal’ of the new tapestry.

Monday, July 12, 2010

Text, Science, and Matisse,

Spiral_close-upI’ve been thinking about the text and weaving. In looking at the soumak pseudo spiral above, this may be the best method of making text. Curves are much easier to obtain, and one might even get a cursive-type of writing. But I really wanted wider letters, so I tried the what’s shown below. Before deciding what to do next time, I will have to change the orientation of the letters before weaving. Then I will also probably try some blockier type of font, maybe something like this, without the little curlicues at the bottom of the t.

Text

   Text_x

Text2


Imagine working for seven years on the same project! Now I know that Matisse was working on other projects at the same time, but gee, don’t you just finally say enough already? In the NY Times, there is an article about how the paintings of Matisse evolved over time—not the usual study from one painting to the next, but the study of one painting and how it changed to the final product. Of course, this type of reflection that brings change to a project is not possible for most of us weavers. How many looms with unfinished projects do we have room for? However, I’m sure we’ve all looked back at a finished work and thought how we’d do something differently. Maybe that’s what leads to a series. But is it something we’d do differently, or just an advancement on the original idea?

Succession H. Matisse/Artists Rights Society, New York

“Bathers by a River” went through a seven-year evolution as Henri Matisse continued to make changes, which can now be traced by curators using X-ray technology.

The following is a quote from the article about how this exhibit came about and the process of studying the various works.

The exhibition’s organizers, Mr. Elderfield and Stephanie d’Alessandro, the curator of modern art at the Art Institute of Chicago, where the exhibit was first shown, focused on 26 paintings, drawings and sculptures, which they examined with new digital imaging techniques, laser scanning, ultraviolet illumination and up-to-date computer software. They also tested paint samples and studied fresh material unearthed from the artist’s family archives in Issy-les-Moulineaux, a Paris suburb.

Website: http://sherriwoodardcoffey.com
Blog: http://sherriwoodardcoffey.blogspot.com
Twitter page
Facebook page

Wednesday, July 7, 2010

Text and ikat

No, not text and ikat together, but it could be done. Hmmm…maybe that should be next…

I played around with text in Word, but of course I only printed it out for a cartoon and didn’t save it! Reinventing the wheel here. I used the Word Art feature to copy, paste, and play around with different fonts. When you use Word Art, the text enters the document as a kind of clip art, so you can drag the corners and center to manipulate the text the way you want. Who knows if what I weave will look anything like the intended font. It will be a guide only to getting text into a weaving. This will be on the next section of my Mirrix project, the last square. I plan to do some more soumak with this.

clip_image001

clip_image001[4]

clip_image001[6]

Last week a new chair PurpleChairarrived in my house, via my car from Office Depot. So far, I’m thinking this is pretty nifty. I’ve been needing a chair for using at the ikat board so that my back does not get so stiff and sore. I saw this one in the store—but couldn’t find online :(—and loved it first because, okay, I admit it, I’m shallow—it’s color! Price was reasonable too. When I went to buy it, they explained to me that it is pink with two additional chair covers, chartreuse and purple. Unfortunately, it comes in a box and has to be assembled. I’m loving it so far! The only drawback is that the casters can gather up yarn and cut off ikat tape pieces. Just have to adjust how I do things.

 Blue-IkatThis is board two for the blue section of the ikat piece that I’m working on. After this one is wrapped and tied, I will move on the the red section. There is a temptation to measure and tie several ikat projects at once.  Below is an in-progress picture, on which, if it will load larger, there is some explanatory text. And you can see the pile of ikat tape ready to be used on the right. The portion show that is already tied is in 1/8 increments so that the design will appear more rounded when woven. At least that’s the plan!BlueIkatwithYellow-tape

Website: http://sherriwoodardcoffey.com

Blog: http://sherriwoodardcoffey.blogspot.com/

Friday, July 2, 2010

Soumak again

Spiral

First of all, let me say that these pictures do not represent anything that I really like, either design-wise or good craftsmanship-wise. I am simply experimenting in a non-threatening environment. In the top picture, you might notice the line with text. This particular area points out one of the major problems that I have with using soumak lines. I forget the direction with which I am wrapping the warp! To get the top portion of the orange line to be straight, observe that I was entering from the right, and then catch myself when I forgot that.

After reading the appropriate section of Line in Tapestry, I decided to try the spiral next. I am drawn to spirals nearly always, but I prefer to have one a little more filled in. This soumak method might work with a filled in, thicker spiral to kind of smooth out the edges—I just don’t know yet. Obviously, there are a few problems with the spiral technique. When I want a square spiral, I will make it square. All angles in this spiral were purely unintentional and caused by my faulty soumak technique. In a piece that mattered, I would have made corrections. For this I am sticking with the warts! I think a technique like this would work with simple petroglyphs-style of design.  Below is a close-up of the spiral.Spiral_close-upAfter reading the posts in the Tapestry Yahoo group for the last few days, I may attempt some text in the last square to be woven. Yes, I said last square! Yippee! Because I am so bored with these small tedious squares. I think I need to try something that fills the available space next. On the other hand, I am also looking forward to finishing this in order to see what kind of whomper-jawed cube I end up with. This started out as a pulled warp idea. Hmmm…

image

At the Houston Center for Contemporary Craft is a show called Paper Runway. Here is the link for the creator of the above dress.

This is a link about textile mills in North Carolina that have escaped Armageddon.

Website: http://sherriwoodardcoffey.com

Blog: http://sherriwoodardcoffey.blogspot.com/

Wednesday, June 30, 2010

More Soumak lines, warts and all

I have decided to set myself on a course of study within the parameters of things that I want to weave on the Mirrix. Below is a bad picture of some soumak lines.Soumak_lines

As you can see, there are a few problems with my practice so far—all fixable in the future, but not in this weaving. I’ll start with the vertical line in the center. First of all, there should be no gaps like what you see in the picture. Second, I forgot the direction of my wrap for the soumak and got a crooked line. On the left, there are two lines of soumak, back and forth. On the right, in the center of what should have been purple, there is a row of unlocked soumak, two picks of weft, then another row of unlocked soumak going the opposite direction. Now for my favorite one—the yellow triangle. I wove the angle, then a row of soumak along the angle. Kathe calls this soumak something on the order of the fixer because it hides the unevenness of the angle. That one row of soumak looked really good, and is something that I will use again, but then I decided to fill in the whole triangle with back and forth locked soumak. That section feels thicker, but really does not look thicker. The texture of that section is different from the rest of the cloth, though.

Just ordered three metal temples from Dawn MacFall. Better price than what I have paid before. I want to build up my size collection so that I can use a temple on each end of a piece (after cutting off the loom) to help with the draw in that results from needle weaving the ends back in to the cloth. I keep working on that, hoping that at some point I will have done the needle weaving and have a perfectly aligned piece! Yeah, like that’s gonna happen!

I am also seriously considering a skein winder from Crazy Monkey. I have been asked to dye some yarn for someone, so will need to make skeins. Skein-making is a seriously time-consuming task.

Website: http://sherriwoodardcoffey.com

Blog: http://sherriwoodardcoffey.blogspot.com/

Tuesday, June 29, 2010

Soumak

I’m getting a little bored with these squares, so I’m just going to get them done with as little fuss as possible. And I decided to experiment with a vertical line. From Kathe Todd-Hooker’s book Line in Tapestry, I found the vertical line section using soumak (page 46). Now, I have used soumak for ages, but usually as a base to start a piece and as a device to help hold the weft in place when it is cut off the loom. Also, since I am basically a rug weaver, I have not wanted areas of high texture, which might wear—probably not a problem since no one puts them on the floor anyway!

Below is a picture of the way I usually join a section with a dovetail. Since I weave across the whole of the cloth (not building up sections), each color goes around the “up” warp. Because of the weft going around the same warp thread, there is sometimes a problem with buildup in that area. To counteract that, I may alternate going around the common warp thread and NOT going around it, forming a teeny slit area. Dovetail

I decided to start my experiment with a vertical soumak line at the dovetail join area. In the picture below, the white line indicates the usual dovetail section. The green line shows the vertical soumak line. (You can also see the regular soumak line along the bottom edge of the color sections.) The orange yarn on the right is the tail of my starting spot, then the line, which looks just like a piece of yarn laying on the piece in this picture, then the tail of my working orange yarn. Right away I noticed a problem with doing soumak in this way—I have to remember direction. If you change the direction from which you go around the warp, you will get a wavy vertical line. At this point I don’t care about that, but it might be important later.

Dovetail_Line

This soumak could be fun, so I will experiment with some of the other soumak types while finishing these squares.

Website: http://sherriwoodardcoffey.com

Blog: http://sherriwoodardcoffey.blogspot.com/