
The tool is a lamp work bead, offering the heavy weight I want to hold some warp threads as if they were tied down. I am using a horizontal loom, so they can hang over the edge. Below is a picture of both warp weights, each holding five warp threads.
 I started the looming with the weighted warps laying parallel to the warps attached on the loom. My first first rows are sewn with a few warps 'doubled'. You can see in the picture below, how the white weighted warps are laying together with the light green warps. I used a different color thread so this would stand out better in these pictures.
Now that I have a few rows completed, holding down all of my warps, weighted and attached, I'll begin sorting them out. You can see in the picture below, I have set aside the weighted warps, creating a base using the attached warps only. Because these added warps are secured to the lamp work weights, they are movable and easily adjusted, all the while staying the same distance apart, row to row.

How large or long of a base is up to you and your design ideas. I wanted to create a 'ribbon', meandering through the loomed base, cuff. There are other great design ideas, using the layered method, a 'ribbon' is just one of them.

I used a rubber wine cork to hold the warps up, while I loom my second level, above the base looming. The rubber cork helps to keep the weighted warps from slipping off, while I add my beads.

I trimmed the outside edges of the ribbon in gold. You can see how you can gauge the size of curve you want to create, by considering where you will attach it to the looming. If you are creating a cuff, be sure to allow for the 'bend' of your cuff, when you take this off the loom. If you are not considering the extra length of the ribbon section, it won't sit up and away from the loomed base, while wearing.

The other ribbon, to the right of the first I completed, was also finalized in the same manner, only at a different length. This will tie into my design idea.

Once my desired length of ribbon is completed, I will introduce the white weighted warps, back into my base looming. You can see how the row I just added, includes the white weighted warps.

Below, the left ribbon is completely secured where the right ribbon is being attached, a few rows further down the cuff. This is just how my pattern will unfold, an uneven meandering of the ribbon, through the entire cuff.

You can see in the picture below, I have completed a number of 'ins & outs'. I also decided to converge the two ribbons in to one wide white ribbon, as an interesting design idea.
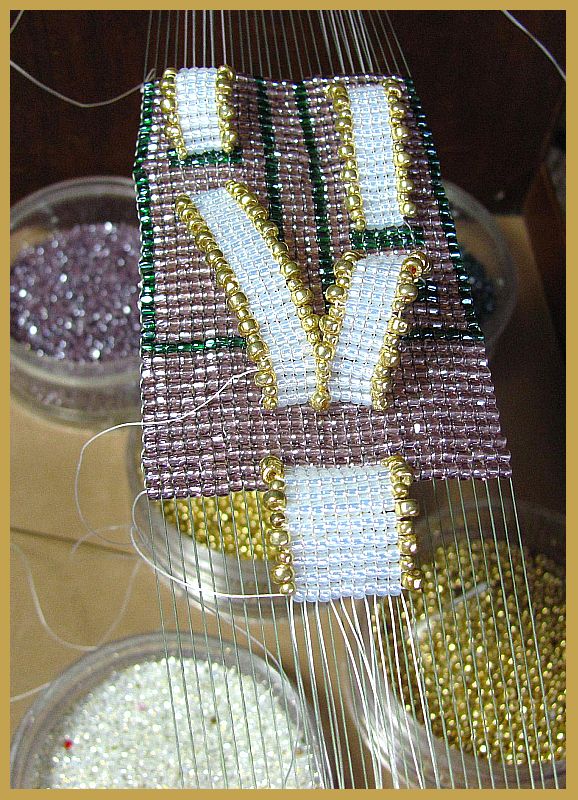
From the side, you can get a better feel of the dimension 'Layered Looming' creates.

Usually, my 'prototype' looming ideas become completed pieces of wearable art. However, in this case, I decided to loom using some gorgeous cut glass beads which are not evenly sized. I thought I could 'cull' my way through and loom something perfectly uniform in shape, but it just didn't happen form me. You may take my loom, but let me keep my Delica's!

In closing, I would like to play the Devil's Advocate. While looming, I was thinking how this design could have also been accomplished by hand weaving a square stitch ribbon and applying to this looming. There is less work creating this idea in this manner, with less threads to hide and secure. My hand weaving skills don't seem play up to many bead artist's skills I have seen, but I also feel more comfortable behind a loom. It occurs to me, I think more in terms of 'warps & wefts' when I design, then I do from any other angle. Not only that, because my warp management techniques make warps disappear with out a problem, I'll continue to stretch my creative goals via the loom, filled with warps and waiting for the weft!

