
Sunday, November 28, 2010

Saturday, November 27, 2010
Creating Dimensions in Looming!

It is accomplished much like you would complete 'bead embroidery', stringing three or four beads, taking a stitch then going back through the last two or three beads added. When I make my stitch, I am careful to only pick up either the warp or run my thread through a set of loomed beads. This way, I won't have any threads showing on the underside of my looming when finished, nor will I have to back my design.
To create the next level of dimension, I thread a 6mm Permanent Silver Metallic bead onto the thread, securing this bead in between the level I am adding and the base below. You can notice a few of these large beads, placed in between my petals. Some areas, I chose to add two instead of just one.
If you are familiar with 'Paper Tole', the art of cutting out the same design and reassembling the picture using silicone glue to make the picture look 3D. I call my method of creating dimension on this SLN, 'Bead Tole'.

Looking from different vantage points, you can see the dimensions come to life. I am even including some 'cupped' petals which will also create a realistic feel, as in the petal on the lower right side.

From the front view, you don't notice the levels of dimension, but after adding more, you will be able to notice this picture from any angle.
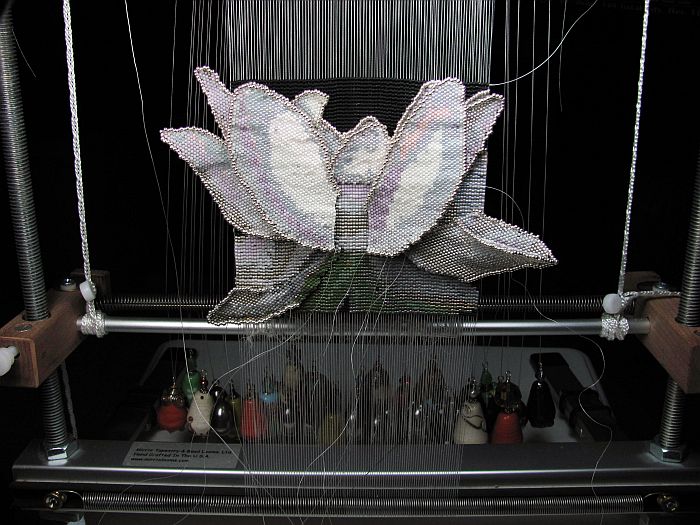
There is many more parts to chart/graph and hand weave, which will finally bring me to my total picture. I have attached all that I have completed, to this point, and will be graphing out other portions to hand weave. The green leaves, in the lower part of the Lotus, will be some of the last parts added, as they stand further forefront.
Social Market for a Mirrix
I cropped and rotated one of the photos to give you an idea of what it will eventually look like when it’s finished.

I’m still working out what I’m going to use for the sky. One of the things I love about living in the Southwest is the sunsets but replicating those colors is always a challenge. Nothing that I’ve tried so far is quite right.
And I may do the next version in 3/2 Pearl Cotton instead of my original plan. The Pearl Cotton has such a beautiful sheen to it and there are so many colors to choose from that you can create incredibly nuanced details in weavings.
There have been so many new ideas that I want to try coming up lately that I’ve started keeping a journal on my work table to make notes of ideas and color combinations. There just aren’t enough hours in a day.
For those of you interested in seeing some truly beautiful tapestry work, take a look at the Artist Pages on the American Tapestry Alliance’s website.
Wednesday, November 24, 2010
Social Market for a Mirrix
Okay, here’s where I’m at right now. As you can see, the rock faces that make up what will be the left side of the tapestry are done and I’m working my way up what will eventually be the bottom of the tapestry. I’m not sure I’m completely happy with the way the rocks currently look but I’m reserving final judgment until the piece is completed and off the loom.

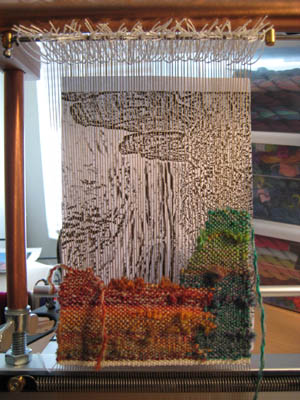

Once this piece is finished, I’m planning to do another version using the same yarns but with the cartoon oriented correctly. I think it will be interesting to see the similarities and differences between the two pieces based on the direction of the weaving.
I’m heading to the Needle’s Eye this weekend to see if I can find some yarn for the sky that will make me happy. Something variegated with blues and sunset colors.
On another note, I’m loving the recycled silk yarn from
If you have a few minutes, check out Weaving Today’s blog post “Of Memory and Hope” and the Centro de Textiles Tradicionales del Cusco, a nonprofit organization working to promote the history and production of traditional Peruvian textiles.
Sunday, November 21, 2010
Lotus SLN
My next looming is something I have shared earlier, but needed to take some time off to complete a few commissions and other projects. I'll be looming full force on this SLN, (split loomed necklace), from now on. To start, I am sharing a picture of where I am to date.

In the picture above, you notice the loomed base of my SLN, being the large part of my pattern, A Lotus. Also attached are a few of the petals, I am hand weaving. The entire Lotus will be completed with 3D petals and leaves. Here are few that I haven't attached yet.

After I complete the bulk of the 'petal additions', then I will complete the lower end of the looming, all the while I will be scribbling and graphing out some interesting designs for the upper looming. The warp weights attached are giving me 'creative license' to make some neat designs! The Mirrix is also perfect for utilizing the warp weight method!
Saturday, November 20, 2010
Social Market for a Mirrix
I started a small tapestry this morning. In order to create my cartoon, I pulled up the photo I wanted to use in Adobe Photoshop (I’m using Creative Suite 4), re-sized it to 7 ½ inches high by 10 inches wide, set the Mode to Grayscale, applied the Photocopy filter, then printed a black and white version, as well as a color version. This is basically the same process I use when I’m creating transparencies to create solarplates for printmaking. There’s really more detail than I need in the cartoon for this version of the tapestry but it will be useful later.

The black and white version is placed behind my warp threads to provide the pattern for me to follow as I’m weaving and the color version hangs on the wall in front of me as a color reference. Picture red rock cliffs, a valley, blue sky with the beginnings of a sunset.

As you can see, I have the cartoon rotated 90 degrees counter-clockwise. Since I’m using a variegated yarn for the rock faces, working in this direction gives the rocks a more natural look. Once again, I’m using the Feza Fiona in earth tones for the rock faces.
While I was mucking about in Photoshop earlier I created a number of cartoons for future tapestries including a couple of abstracts that I’m really excited about. The color variations are gradual and very subtle so they’re probably going to be a test of my patience. And I need to find just the right fibers to work with.
One thing I’ve decided after working on the 16” Mirrix is that I’m going to upgrade to the largest Mirrix loom in 2011. I’m really starting to feel the need to begin working large.
Don’t forget to stop by WeaveZine to hear Syne's interview with Claudia. I have a very eclectic (okay, okay, I’m more than a bit eccentric) background so I’m always fascinated by how people got started doing what they do.
Also, check out the blog ‘the gift half understood’. She’s doing some really interesting sculptural work with weaving "influenced by monolithic standing stones, burial rituals, stone surfaces, and offerings".